Insert buttons into an edit control
9 minute read •
This tutorial will show you how to insert a button into the non-client area of an edit control. The effect of this is very similar to the drop-down button in a combo box. However, there is the potential to do much more than simply display a drop-down arrow. The technique of inserting a button can actually be applied to any type of window. For this example we will use an edit control, but any other window could be used.
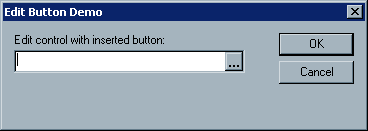
The picture below will give you an idea of what we are trying to achieve.
Subclassing the edit control
The key to this technique is subclassing. We will replace the window procedure of our edit control with a new procedure. This procedure will perform some additional tasks to implement the inserted button, and then use the default window procedure to provide the original functionality of the edit control.
Our inserted button will need to have some kind of state. We need to know where the button will live, and also if it is pressed in or out. We might also want to store a command identifier for the button, so that we can generate WM_COMMAND messages when the button is clicked. It will therefore be necessary to associate this state information with what ever window we decide to subclass. The following structure will hold our state:
typedef struct
{
    UINT uCmdId; // sent in a WM_COMMAND message
    UINT fButtonDown; // is the button up/down?
    BOOL fMouseDown; // is the mouse activating the button?
    WNDPROC oldproc; // need to remember the old window procedure

    // size of the current window borders.
    // given these, we know where to insert our button
    int cxLeftEdge, cxRightEdge;
    int cyTopEdge, cyBottomEdge;

} InsBut;
Now that we know how our button will be represented, we can write a function to subclass the edit control.
BOOL InsertButton(HWND hwnd, UINT uCmdId)
{
    InsBut *pbut;
    pbut = HeapAlloc(GetProcessHeap(), 0, sizeof(InsBut));

    if(!pbut) return FALSE;

    pbut->uCmdId = uCmdId;
    pbut->fButtonDown = FALSE;

    // replace the old window procedure with our new one
    pbut->oldproc = (WNDPROC)SetWindowLong(hwnd, GWL_WNDPROC, (LONG)InsButProc);

    // associate our button state structure with the window
    SetWindowLong(hwnd, GWL_USERDATA, (LONG)pbut);

    // force the edit control to update its non-client area
    SetWindowPos(hwnd, 0, 0, 0, 0, 0, SWP_FRAMECHANGED |
        SWP_NOMOVE|SWP_NOSIZE|SWP_NOACTIVATE|SWP_NOZORDER);

    return TRUE;
}
Inserting the button
Now that our new window procedure is in place we can get to work. The first step is to allocate some space in the non-client area of the edit control. This is performed by handling the WM_NCCALCSIZE message in the subclass procedure.
RECT *prect;
RECT oldrect;

// get the button state structure
InsBut *pbut = (InsBut *)GetWindowLong(hwnd, GWL_USERDATA);
...

case WM_NCCALCSIZE:
    prect = (RECT *)lParam;
    oldrect = *prect;

    // let the old wndproc allocate space for the borders,
    // or any other non-client space.
    CallWindowProc(pbut->oldproc, hwnd, msg, wParam, lParam);

    // calculate what the size of each window border is,
    // we need to know where the button is going to live.
    pbut->cxLeftEdge = prect->left - oldrect.left;
    pbut->cxRightEdge = oldrect.right - prect->right;
    pbut->cyTopEdge = prect->top - oldrect.top;
    pbut->cyBottomEdge = oldrect.bottom - prect->bottom;

    // now we can allocate additional space by deflating the
    // rectangle even further. Our button will go on the right-hand side,
    // and will be the same width as a scrollbar button
    prect->right -= GetSystemMetrics(SM_CXVSCROLL);

    // that's it! Easy or what!
    return 0;
The source above firstly calls the old window procedure of the edit control, to let the default action of border allocation take place. After this has been done, we can then reserve space for our new button.
Drawing the button
Drawing the button is easy now that we have the space allocated to draw it in. Because we are drawing the button in the non-client area of a window, we need to handle the WM_NCPAINT message.
The first thing to do is obtain a handle to a device context. We do this with GetWindowDC. Because this is a window-DC (rather than a client-area DC), all drawing takes place from the upper-left corner of the window (NOT the client area of the window). All coordinates start from 0,0.
// retrieve the coordinates of an inserted button, given the
// specified window rectangle.
void GetButtonRect(InsBut *pbut, RECT *rect)
{
    rect->right -= pbut->cxRightEdge;
    rect->top += pbut->cyTopEdge;
    rect->bottom -= pbut->cyBottomEdge;
    rect->left = rect->right - GetSystemMetrics(SM_CXVSCROLL);

    // take into account any scrollbars in the edit control
    if(rect->cxRightEdge > rect->cxLeftEdge)
        OffsetRect(rect, pbut->cxRightEdge - pbut->cxLeftEdge, 0);
}
HDC hdc;
RECT rect;

// get the button state structure
InsBut *pbut = (InsBut *)GetWindowLong(hwnd, GWL_USERDATA);

...
case WM_NCPAINT:
    // let the old window procedure draw the borders / other non-client
    // bits-and-pieces for us.
    CallWindowProc(pbut->oldproc, hwnd, msg, wParam, lParam);

    // get the screen coordinates of the window.
    // adjust the coordinates so they start from 0,0
    GetWindowRect(hwnd, &rect);
    OffsetRect(&rect, -rect.left, -rect.top);

    // work out where to draw the button
    GetButtonRect(pbut, &rect);
    hdc = GetWindowDC(hwnd);

    // now draw our inserted button:
    // draw a 3d-edge around the button.
    if(pbut->fButtonDown)
        DrawEdge(hdc, &rect, EDGE_RAISED, BF_RECT | BF_FLAT | BF_ADJUST);
    else
        DrawEdge(hdc, &rect, EDGE_RAISED, BF_RECT | BF_ADJUST);

    // fill the inside of the button
    FillRect(hdc, &rect, GetSysColorBrush(COLOR_BTNFACE));

    ReleaseDC(hwnd, hdc); // that's it! This is too easy!
    return 0;
Bringing the button to life
A static button in an edit control isn’t much use to us. The last step is therefore to handle the appropriate mouse messages to make the button “clickable”. We need to handle three mouse messages:
Mouse button down (WM_NCLBUTTONDOWN)
When the left mouse button is clicked, and the mouse cursor is within the area occupied by our button, then we need to react to this event and give the button a depressed look. We will also set the mouse capture so we can get all further mouse messages whilst the mouse button is held down. This means that we can move the mouse outside the window and can still retrieve mouse messages and react to them accordingly.
RECT rect;
POINT pt;
...

case WM_NCLBUTTONDOWN:

    // get the screen coordinates of the mouse
    pt.x = GET_X_LPARAM(lParam);
    pt.y = GET_Y_LPARAM(lParam);

    // get the position of the inserted button
    GetWindowRect(hwnd, &rect);
    GetButtonRect(pbut, &rect);

    // check that the mouse is within the inserted button
    if(PtInRect(&rect, pt))
    {
        SetCapture(hwnd);

        pbut->uState = 1;
        pbut->fMouseActive = TRUE;

        //redraw the non-client area to reflect the change
        RedrawNC(hwnd);
    }
    break;
Mouse Movement (WM_MOUSEMOVE)
When a window has captured the mouse, it will not receive any more non-client mouse messages. So, if we want to react to the mouse moving (with the capture set), we must handle WM_MOUSEMOVE , and NOT the WM_NCMOUSEMOVE message.
When the mouse moves, we need to check the position of the cursor again. If the cursor is inside the button, then we will make it look “depressed”. If the mouse moves outside the button, then the button must automatically pop back up again. This emulates the way a normal button in Windows works.
RECT rect;
POINT pt;
UINT oldstate;
...

case WM_MOUSEMOVE:
    if(pbut->fMouseActive == FALSE)
        break;

    // get the CLIENT coordinates of the mouse
    pt.x = GET_X_LPARAM(lParam);
    pt.y = GET_Y_LPARAM(lParam);

    ClientToScreen(hwnd, &pt);

    // get the position of the inserted button
    GetWindowRect(hwnd, &rect);
    GetButtonRect(pbut, &rect);

    oldstate = pbut->uState;

    // check that the mouse is within the inserted button
    if(PtInRect(&rect, pt))
        pbut->uState = 1;
    else
        pbut->uState = 0;

    // redraw the non-client area to reflect the change.
    // to prevent flicker, we only redraw the button if its state
    // has changed
    if(oldstate != pbut->uState)
        RedrawNC(hwnd);

    break;
Mouse button up (WM_LBUTTONUP)
We’re almost there. All there is to do is detect when the mouse button is released. We do one of two things when this happens. If the mouse is released when it is over the button, then the button has been clicked. We can therefore post a WM_COMMAND message to the parent window. If the mouse is outside the button when it is released, then we do nothing. In both cases, we redraw the button in its normal state, and release the mouse capture.
RECT rect;
POINT pt;
UINT oldstate;
...

case WM_LBUTTONUP:
    if(pbut->fMouseActive == FALSE)
        break;

    // get the CLIENT coordinates of the mouse
    pt.x = GET_X_LPARAM(lParam);
    pt.y = GET_Y_LPARAM(lParam);

    ClientToScreen(hwnd, &pt);

    // get the position of the inserted button
    GetWindowRect(hwnd, &rect);
    GetButtonRect(pbut, &rect);

    // check that the mouse is within the inserted button
    if(PtInRect(&rect, pt))
    {
        PostMessage(GetParent(hwnd), WM_COMMAND,
                    MAKEWPARAM(pbut->uCmdId, BN_CLICKED), 0);
    }

    ReleaseCapture();
    pbut->uState = 0;
    pbut->fMouseDown = FALSE;

    // redraw the non-client area to reflect the change.
    RedrawNC(hwnd);

    break;
There is one last mouse message to process. We need to handle the WM_NCHITTEST message, which we receive when the mouse moves over the window. We have to return a code indicating that our inserted button region is a valid window portion. If we don’t do this, then we won’t get any mouse messages when the mouse moves over the button area.
case WM_NCHITTEST:
    // get the screen coordinates of the mouse
    pt.x = GET_X_LPARAM(lParam);
    pt.y = GET_Y_LPARAM(lParam);

    // get the position of the inserted button
    GetWindowRect(hwnd, &rect);
    GetButtonRect(pbut, &rect);

    // check that the mouse is within the inserted button
    if(PtInRect(&rect, pt))
        return HTBORDER;
    else
        break;
Wrapping Up
The last step to perform is to clean up after ourselves when the edit control gets destroyed. Because we allocated a structure using HeapAlloc, we must free it using HeapFree. The best place to do this is during the processing of the WM_NCDESTROY message. This is the very last message that a window receives before it is destroyed.
WNDPROC oldproc;
...

case WM_NCDESTROY:
    oldproc = pbut->oldproc;
    HeapFree(GetProcessHeap(), 0, pbut);

    return CallWindowProc(oldproc, hwnd, msg, wParam, lParam);
You will notice that the old procedure handle is copied into a temporary variable. We do this because the oldproc member in the button structure becomes invalid as soon as the memory to it is released. This is the only time that the old window procedure isn’t called through the pbut->oldproc member.
Conclusion
I hope you have found this tutorial useful. There are still a few things that you can do to improve the inserted button. For a start, it doesn’t have any type of image associated with it. Your next step would be to modify the drawing code to draw whatever effect you want. One possibility would be to draw a set of ellipses (…) on the button. This would then turn the inserted button into a very effective “Browse for file” button. Alternatively, your inserted button could toggle between several different states. For example, the button could control a number displayed in an edit box, and toggle in between decimal and hexadecimal number systems.
The technique presented here can be applied to any sort of window, and can be used to perform many different types of effects. This very technique is the one used by the Cool Scrollbar library, which you will also find in the tutorials section.
 editbut.zip