Custom Controls
20 minute read •
A custom control is any child window which displays information or allows the user to interact with it in some way. This article describes the steps required to create a custom user control from scratch, using pure Win32 techniques. This custom control will not be an ActiveX control, or possess any other magical properties. Rather, we will be creating a simple control, similar to the way edit controls, buttons or listboxes work.
The example control we will build will be a simple text label, but will change colour whenever the user clicks on it. This simple example will be sufficient to help explain all the steps necessary to create any custom control.

Getting Started
A custom control is nothing special. It is just a standard window, but created with the WS_CHILD style set. The custom part comes in because we write a new window procedure to provide the necessary control display and interaction.
So, first things first. We’re going to create a new source-file to put just the custom-control code in. Call this CustCtrl.c or something. If you take this modular approach from the start you will find it so much easier to develop and maintain your code. This source file just needs to contain the following two lines for now:
#include <windows.h>
#include <tchar.h>
The <tchar.h> file enables us to write Unicode-compatible windows programs. In a few places in the code, you will see things like “TCHAR” and “_T”. These are macros defined in <tchar.h>, which help us to easily create Unicode applications, if we want. Our custom control won’t be Unicode, but it could be if we used the correct compiler settings.
In order to create a new type of window, we need to register a new window class. This is achieved with the RegisterClassEx API call, shown below.
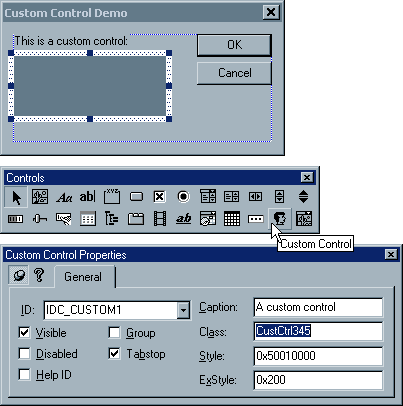
TCHAR szClassName[] = _T("CustCtrl345");

void InitCustomControl()
{
    WNDCLASSEX wc;

    wc.cbSize = sizeof(wc);
    wc.lpszClassName = szClassName;
    wc.hInstance = GetModuleHandle(0);
    wc.lpfnWndProc = CustWndProc;
    wc.hCursor = LoadCursor (NULL, IDC_ARROW);
    wc.hIcon = 0;
    wc.lpszMenuName = 0;
    wc.hbrBackground = (HBRUSH)GetSysColorBrush(COLOR_BTNFACE);
    wc.style = 0;
    wc.cbClsExtra = 0;
    wc.cbWndExtra = 0;
    wc.hIconSm = 0;

    RegisterClassEx(&wc);
}
So far so good. The next step is to write a window procedure ( CustWndProc ) which the custom control uses to process it’s messages. This is just a standard window procedure, like the one shown below.
LRESULT CALLBACK CustWndProc(HWND hwnd, UINT msg, WPARAM wParam, LPARAM lParam)
{
    switch(msg)
    {
    default:
        break;
    }

    return DefWindowProc(hwnd, msg, wParam, lParam);
}
Now, it may look as if this window procedure doesn’t actually do anything, but this is not the case. The DefWindowProc API call performs alot of default processing (window focus, painting, activation etc) for a window. It is only when we need to provide additional functionality (like drawing the window focus) that we need to start filling in that switch statement to handle specific windows messages.
Creating the control
Now we can create a custom control! There are two ways to do this. The first is to manually create the control at run-time (probably in the main window’s WM_CREATE message, or something similar). This is achieved with the CreateWindowEx API call, like this:
HWND CreateCustomControl(HWND hwndParent)
{
    HWND hwndCtrl;

    hwndCtrl = CreateWindowEx(
                 WS_EX_CLIENTEDGE, // give it a standard border
                 szClassName,
                 _T("A custom control"),
                 WS_VISIBLE | WS_CHILD,
                 0, 0, 100, 100,
                 hwndParent,
                 NULL, GetModuleHandle(0), NULL
               );

    return hwndCtrl;
}
The second way, assuming you are using some kind of resource editor (like in Visual C++), is to create a custom control in a dialog template, in the exact same way you might place edit controls or list boxes on a dialog box. The only difference is, you create a “Custom Control”, and manually define the name of the window class (in this case, “CustCtrl345”). When your dialog is created, Windows automatically creates the custom control for you, and gives it a control ID.
Custom control state information
At some point in time, you will want to make the control do something. And, unless your control is going to be extremely simple, you will undoubtably want to define variables, text strings or arrays to represent the state of the control. For example, in a custom list control, you would at the very least need to keep track of the items in the list, using an array or linked list. You would also need a variable which keeps track of how many items there are in your list. In addition, if you want your control to be scrollable, you will need to keep track of the scrollbar position, and the minimum and maximum scroll ranges.
You need to take my word that you will need to define a structure (or class, if you are using C++) which will encapsulate ALL of the control’s state information. If you take this approach (and avoid using global variables), you will be able to create multiple custom controls at the same time, and each one will look after itself.
We need to decide what attributes our custom control will have. The list below describes these attributes.
- Text colour (Foreground and Background)
- Display text (what the control actually displays)
- Font (what type-face the text will be drawn in)
The following structure will hold some simple state information.
typedef struct
{
    COLORREF crForeGnd; // Foreground text colour
    COLORREF crBackGnd; // Background text colour
    HFONT hFont; // The font
    HWND hwnd; // The control's window handle
} CustCtrl;
The one element missing from this structure is the display text. For our simple example, this is not necessary, because every window has it’s own window text. Therefore we will just use this standard window text when we draw the control. For more complicated controls (lists, edit controls), you would need to store the text yourself.
Associating a structure with the custom control
At this point you will hit a stumbling block. The problem is, your custom window procedure is a simple callback function, which processes all messages for all custom controls you create. Depending on which window is currently having it’s message processed, we will have to obtain the correct state structure for that window, and use that structure when processing the message.
There are many ways to “attach” a structure to a window. Which one you use can depend on many things, but I will describe each method below. First though, we will define two simple functions, which will set and retrieve our custom structure for a window:
CustCtrl * GetCustCtrl(HWND hwnd)
{
    // get pointer to structure, then return it
    CustCtrl *ccp = ???
    return ccp;
}

void SetCustCtrl(HWND hwnd, CustCtrl *ccp)
{
    // attach pointer to window
}
The GWL_USERDATA area.
Every window in the system has a 32bit integer which can be set to any value. This 4 byte storage area is enough to store a pointer to a structure. We set this integer using SetWindowLong, and retrieve the integer using GetWindowLong. Using this technique, our function will look like this:
CustCtrl * GetCustCtrl(HWND hwnd)
{
    return (CustCtrl *)GetWindowLong(hwnd, GWL_USERDATA);
}

void SetCustCtrl(HWND hwnd, CustCtrl *ccp)
{
    SetWindowLong(hwnd, GWL_USERDATA, (LONG)ccp);
}
This method is usually used when subclassing a control rather than writing one from scratch, because there are better alternatives. The problem with this method is that any application or window can set this user-data-area, so you need to be careful it is never used by two conflicting components.
Window Properties
Window properties allow a program to attach multiple 32bit integer values to a window, using a textual string as a way to map each property to the associated integer value. In actual fact, a window property is really a HANDLE value (i.e. a handle to a block of memory, or a GDI resource). However, a HANDLE is still a 32bit integer, so we will store a pointer to a custom structure as a HANDLE.
TCHAR szPropName[] = _T("CustCtrlPtr");

CustCtrl * GetCustCtrl(HWND hwnd)
{
    return (CustCtrl *)GetProp(hwnd, szPropName);
}

void SetCustCtrl(HWND hwnd, CustCtrl *ccp)
{
    SetProp(hwnd, szPropName, (HANDLE)ccp);
}
This method will be a little slower than the rest, simply because of the string comparisons that windows will have to do when it retrieves a window property for us. It’s not much slower though, and because we only need to do this once for every message we receive, it’s not much of an overhead at all.
Extra window bytes
This is the best way to go if you are writing a control from scratch. When you initially register a control’s window class, you have the option of specifying how many extra bytes of user-storage each window of that class will contain. If we set this value to be the size of a pointer (to our state structure), then we can use this special-purpose space exclusively for our custom control. This then leaves the GWL_USERDATA area for other purposes.
// Register the window class.
wc.cbWndExtra = sizeof( CustCtrl * );
CustCtrl * GetCustCtrl(HWND hwnd)
{
    return (CustCtrl *)GetWindowLong(hwnd, 0);
}

void SetCustCtrl(HWND hwnd, CustCtrl *ccp)
{
    SetWindowLong(hwnd, 0, (LONG)ccp);
}
The extra window bytes are always accessed using a zero-based offset (when using GetWindowLong). Because we reserved space for one 32bit integer, this is accessed from the start of the extra bytes, therefore we use an index of zero.
Indirect lookup tables
The last method (which MFC uses) is to use a separate lookup table, which maps window handles to structures. This is basically just an array or hash table, with entries like this:
typedef struct
{
    HWND hwnd;
    CustCtrl *ccp;
} WndLookup;

WndLookup big_lookup[MAX_CUST_WINDOWS];
Whenever we need to retrieve the custom structure from a window, we need to search the array or hash table for the correct entry. This is fairly quick when we only have a couple of custom windows at any time, but when we start to create alot of windows, this method will add quite an overhead. It is also difficult to intergrate this technique into a multi-threaded application.
Assembly language thunks
This method is included for completeness, and is quite different to the others described above. The technique is used by the ATL and WTL C++ template libraries, and is a very quick method of retrieving an integer associated with a window. It’s pretty complicated though, so our basic method is still preferred.
The basic idea is to replace the window procedure for a custom control with a small assembly language stub which modifies the first argument to the window procedure (the handle to the window), and replaces it with a pointer to the CustCtrl structure. The stub can look something like this:
mov [esp+4], CustCtrl *
jmp orig_proc
You must understand the environment that this stub executes in, in order to understand how this trick works. When the window procedure needs to be called, the win32 sub-system executes a CALL instruction to pass control to the window procedure in question (which is not the window procedure at all, but the assembly-language stub. However, the very act of making a function call to a window procedure (real or not) results in the stack being set to the following state:
... ...
esp+10 [lParam]
esp+0C [wParam]
esp+08 [Message]
esp+04 [HWND] -> [CustCtrl *]
esp+00 [address to return to when function returns]
The stub must perform two key actions when executed:
- Replace the
HWNDparameter on the stack with a pointer to the class or structure that we want to associate with the window. - Pass control to the real window procedure, now with it’s first argument modified.
The stub is generated at run-time, for each window and class/structure instance that is required. Note that the stub is different each time, because the structure and window procedure will be different. The actual op-codes for the MOV and JMP instructions must be generated for each specific case.
As you can imagine, this technique is very fast. The drawback though is that the window procedure can’t make any reference to the HWND parameter - it has changed to be a pointer to the class / structure instead. This means that this structure MUST include the original HWND as a member, otherwise operations on the window would become impossible.
The window procedure, which can be a class-member-function, will look like this:
UINT WINAPI CustCtrl::WindowProc(UINT msg, WPARAM wParam, LPARAM lParam);
Note that there is always a hidden first parameter to every C++ member function - the *this pointer. This means that the class-window procedure has full access to the whole class instance.
To understand more on this topic, read the following article by Fritz Onion:
Creating the control, Take 2
Now that we know how to attach a custom structure to a window, we can use this technique when we create a custom control. The actual CreateWindowEx call can remain the same, but our window procedure needs to change to incorporate the new CustCtrl structure. The differences are this:
- Allocate a new structure when the window is first created.
- Initialize the structure contents to default values.
- Attach the structure to the window (using a pointer to the structure).
- Free the structure memory when the window is destroyed.
The custom control’s window procedure will now need to look this this:
LRESULT CALLBACK CustWndProc(HWND hwnd, UINT msg, WPARAM wParam, LPARAM lParam)
{
    // retrieve the custom structure POINTER for THIS window
    CustCtrl *ccp = GetCustCtrl(hwnd);

    switch(msg)
    {
    case WM_NCCREATE:

        // Allocate a new CustCtrl structure for this window.
        ccp = malloc( sizeof(CustCtrl) );

        // Failed to allocate, stop window creation.
        if(ccp == NULL)
            return FALSE;

        // Initialize the CustCtrl structure.
        ccp->hwnd = hwnd;
        ccp->crForeGnd = GetSysColor(COLOR_WINDOWTEXT);
        ccp->crBackGnd = GetSysColor(COLOR_WINDOW);
        ccp->hFont = GetStockObject(DEFAULT_GUI_FONT);

        // Assign the window text specified in the call to CreateWindow.
        SetWindowText(hwnd, ((CREATESTRUCT *)lParam)->lpszName);

        // Attach custom structure to this window.
        SetCustCtrl(hwnd, ccp);

        // Continue with window creation.
        return TRUE;

    // Clean up when the window is destroyed.
    case WM_NCDESTROY:
        free(ccp);
        break;

    default:
        break;
    }

    return DefWindowProc(hwnd, msg, wParam, lParam);
}
Note the use of the WM_NCCREATE and WM_NCDESTROY messages here. These are the first and last messages to be received by a window, respectively. By using these messages to allocate and free our custom structure, we can be sure that this structure will be in existance for all other window messages we receive.
Adding control functionality
At this point we can create as many custom controls as we desire. The windows won’t actually display or do anything, but you can manipulate them, size them etc, just like any other window you create. Let’s start to add the control’s functionality though.
The first step is to start writing message handler functions for every message you want to handle. It is a very good idea to write a separate function for each message. This keeps the window procedure neat and simple, and keeps your code nice and modular. I can’t stress this point enough - get into the habit of writing separate functions right from the start, because it makes writing your code so much simpler in the long run.
Painting the control
Whenever windows wants us to update the contents of our window (the client area), a WM_PAINT message will be sent. So, whenever the WM_PAINT message is received, we need to call our control’s painting routine.
case WM_PAINT:
    return CustCtrl_OnPaint(ccp, wParam, lParam);
Note how the pointer to the control structure is passed to the message handler function. This will be the same for any message we handle. Now, the actual paint handler will look something like this:
LRESULT CustCtrl_OnPaint(CustCtrl *ccp, WPARAM wParam, LPARAM lParam)
{
    HDC hdc;
    PAINTSTRUCT ps;
    HANDLE hOldFont;
    TCHAR szText[200];
    RECT rect;

    // Get a device context for this window
    hdc = BeginPaint(ccp->hwnd, &ps);

    // Set the font we are going to use
    hOldFont = SelectObject(hdc, ccp->hFont);

    // Set the text colours
    SetTextColor(hdc, ccp->crForeGnd);
    SetBkColor (hdc, ccp->crBackGnd);

    // Find the text to draw
    GetWindowText(ccp->hwnd, szText, sizeof(szText));

    // Work out where to draw
    GetClientRect(ccp->hwnd, &rect);

    // Find out how big the text will be
    GetTextExtentPoint32(hdc, szText, lstrlen(szText), &sz);

    // Center the text
    x = (rect.right - sz.cx) / 2;
    y = (rect.bottom - sz.cy) / 2;

    // Draw the text
    ExtTextOut(hdc, x, y, ETO_OPAQUE, &rect, szText, lstrlen(szText), 0);

    // Restore the old font when we have finished
    SelectObject(hdc, hOldFont);

    // Release the device context
    EndPaint(ccp->hwnd, &ps);

    return 0;
}
Undocumented painting tips
I just want to mention an important feature of Windows here. The standard documention states that wParam and lParam will both be zero for the WM_PAINT message. This is fine, because we can do everything we want with the BeginPaint / EndPaint technique.
However , for alot of standard controls, Windows will sometimes send a WM_PAINT message with wParam set to a handle to a device context. In other words, Windows sometimes supplies a device-context for you, which will result in faster drawing. This means that it is not strictly necessary to use the BeginPaint / EndPaint pair all of the time. To take advantage of this scenario, you could check wParam to see if it is zero or not. If it isn’t, then instead of using BeginPaint to get a device context, just use wParam as your HDC. i.e.
if(wParam == 0)
    hdc = BeginPaint(ccp->hwnd, &ps);
else
    hdc = (HDC)wParam;
Don’t forget to do the same test when you come to call EndPaint - in fact, don’t do anything when you have a pre-supplied HDC from Windows.
Now, you need to be careful using this technique, because the device context that windows supplies will not be initialized to it’s default state, so you need to make sure that you set the device context up in the correct mapping mode, set the correct colours etc. (i.e, don’t assume that the device context will be in a certain state). Also, you must restore ANY setting that you modify, be it font, mapping modes, colours etc.
The custom control presented here does not use this alternative painting method, so you can safely ignore this information if you want.
Preventing flicker
Currently, the control will flicker slightly each time it is painted. This is because it is getting painted twice for every WM_PAINT it receives. The problem is the WM_ERASEBKGND message, which is sent every time we call BeginPaint. This isn’t a problem really - Windows is doing us a favour, because the default action for WM_ERASEBKGND is to draw a nice window background for us (using the window’s default background brush), which we can then paint on top of in the WM_PAINT handler.
However, our WM_PAINT handler also draws the control’s background, so there is no point in this happening twice. Therefore, we need to prevent the default WM_ERASEBKGND behaviour from happending. As usual, there are a number of ways to do this.
- Set the window’s background brush to NULL. (Set the
hbrBackgroundmember of theWNDCLASSstructure to zero when you register the window class). - Return non-zero in the
WM_ERASEBKGNDmessage handler.
Any one of these will steps will prevent the WM_ERASEBKGND message from clearing the window. We will therefore choose the last option, because it is the simplest to implement:
case WM_ERASEBKGND:
    return 1;
Responding to user interaction
Our custom control will change colour whenever the user clicks the mouse on it. Therefore the next message handler will be for the WM_LBUTTONDOWN message.
case WM_LBUTTONDOWN:
    return CustCtrl_OnLButtonDown(ccp, wParam, lParam);
LRESULT CustCtrl_OnLButtonDown(CustCtrl *ccp, WPARAM wParam, LPARAM lParam)
{
    COLORREF col = RGB( rand()%256, rand()%256, rand()%256 );

    // Change the foreground colour
    ccp->crForeGnd = col;

    // Use the inverse of the foreground colour
    ccp->crBackGnd = ((~col) & 0x00ffffff);

    // Now redraw the control
    InvalidateRect(ccp->hwnd, NULL, FALSE);
    UpdateWindow(ccp->hwnd);

    return 0;
}
Receiving input focus
When a user clicks on a window or control it does not automatically receive the keyboard-input focus. Think about it for a while: controls like toolbars and static controls never cause the input-focus to change when you click on them so there must be something else we need to do when the mouse is clicked in our window.
Rather than using the WM_LBUTTONDOWN message (which can be received many times by a window) we will uFor our control to receive input focus we must react to the WM_MOUSEACTIVATE message:
case WM_MOUSEACTIVATE:
    SetFocus(hwnd);
    return MA_ACTIVATE;
By manually setting the input-focus to our control we
Font support
Currently, our custom control only supports the default system font, so we will handle the WM_SETFONT message. Handling this message will allow us to change the font whenever requested by windows.
case WM_SETFONT:
    return CustCtrl_OnSetFont(ccp, wParam, lParam);
LRESULT CustCtrl_OnSetFont(CustCtrl *ccp, WPARAM wParam, LPARAM lParam)
{
    // Change the font
    ccp->hFont = (HFONT)wParam;
    return 0;
}
Mission Completed
At this point in time we need go no further. What you have is a complete custom control. It is now up to you to experiment with the control, to add further features, or to start again using the steps described to create your very own control.
There are still a few things I want to say about writing custom controls, so read on if you havn’t fallen asleep yet!
Using message cracker macros
Message Crackers are pre-processor macros, define in WINDOWSX.H (available with the Platform SDK).
If you are using C++
It is quite possible to use C++ to write your custom control. In fact, it is alot easier than using plain C, because you can create a miniture object framework which makes writing the window procedure a dream. Instead of using a structure to define the control state, you can use a class. And the message handler functions can become member functions of that class.
As a quick example, let’s redefine the structure we used for the custom control:
class CustCtrl
{
public:
    CustCtrl(HWND h);
    ~CustCtrl();

    // message handlers
    LRESULT OnPaint (WPARAM wParam, LPARAM lParam);
    LRESULT OnLButtonDown (WPARAM wParam, LPARAM lParam);
    LRESULT OnSetFont (WPARAM wParam, LPARAM lParam);

    // window procedure
    static LRESULT CALLBACK WndProc(
       HWND hwnd, UINT msg, WPARAM wParam, LPARAM lParam
    );

private:
    COLORREF crForeGnd; // Foreground text colour
    COLORREF crBackGnd; // Background text colour
    HFONT hFont; // The font
    HWND hwnd; // The control's window handle
};
The window procedure now looks like this:
LRESULT CALLBACK CustCtrl::WndProc(HWND hwnd, UINT msg, WPARAM wParam, LPARAM lParam)
{
    // retrieve the custom structure POINTER for THIS window
    CustCtrl *ccp = GetCustCtrl(hwnd);

    switch(msg)
    {
    // Allocate a new CustCtrl class for this window.
    case WM_NCCREATE:
        ccp = new CustCtrl(hwnd);
        SetCustCtrl(ccp);
        return (ccp != NULL);

    // Clean up when the window is destroyed.
    case WM_NCDESTROY:
        delete ccp;
        break;

    // Handle messages
    case WM_PAINT: return ccp->OnPaint(wParam, lParam);
    case WM_ERASEBKGND: return 1;
    case WM_LBUTTONDOWN: return ccp->OnLButtonDown(wParam, lParam);
    case WM_SETFONT: return ccp->OnSetFont(wParam, lParam);

    default:
        break;
    }

    return DefWindowProc(hwnd, msg, wParam, lParam);
}
Notice the difference in the way the C++ class is allocated. The class’s constructor can be used to initialize the object. Also, look at the way the message handler functions are called through a pointer to the class. There is no need to pass the pointer as the first parameter, because a C++ member function has access to the object’s class members. This means, in our message handler functions, there is no need to constantly write ptr->_attribute_, because C++ does this automatically for you with the implicit this pointer. Look at this small example:
LRESULT CustCtrl::OnSetFont(WPARAM wParam, LPARAM lParam)
{
    // Change the font
    hFont = (HFONT)wParam;
    return 0;
}
This is the advantage of using C++. It makes writing this type of object-oriented program alot easier. Now, just one last thing, which is very important. In the C++ class, I defined the window procedure to be a static function. I will explain why this important detail is necessary.
A standard C++ member function always has an implicit first argument, the this pointer. Whenever you call a member function, the C++ compiler automatically includes this hidden argument. This means that our window procedure, if it had been a normal class member, would really have looked like this:
LRESULT CALLBACK CustCtrl::WndProc( CustCtrl *this, HWND hwnd, ...);
You never declare a member function like this, but this is how it works “behind the scenes”. Now, you are probably aware that this function prototype is incompatible with the standard window procedure prototype. In fact, it is impossible to use a member function as a window procedure. Therefore, we need to define the window procedure as a static member , so that the this pointer is omitted from the function prototype.
LRESULT CALLBACK CustCtrl::WndProc(HWND hwnd, ...);
Obviously this means that the window procedure cannot access any member variables. This is why we have to obtain a pointer to the correct class for each window, and call the member functions through that pointer. This is a small inconvenience though for the design benefits that C++ gives us.
Important: Although a custom control can be written using C++, this is as far as it goes. The “interface” to the control (i.e. how it is created, how to move it / size it) hasn’t changed at all. This makes it possible to use C++ to create a custom control, and then use it in a C project. This way you get the best of both worlds.
Conclusion
We have covered alot of ground in this tutorial, but it was necessary because custom controls, whilst not difficult, require careful coding and a reasonable understanding of Windows programming.
Although the example control presented in this tutorial was very simple, the concepts are exactly the same as for a more complicated control. I have shown you the techniques required to build a custom control from scratch. It is now up to you to take these techniques and apply them to your own projects.
Well, happy coding,
James.
 custctrl.zip