Visual C++ Tips & Tricks
10 minute read •
This section presents a collection of Visual C++ 6.0 tips which are often hard to find information about. All of the tips are useful in their own way, and many will work exactly as-is in Visual Studio .NET also, so take a moment to browse through the collection.
1. Debug build works, Release build doesn’t ??
This is the single most common posting made to programming forums and usenet. The answer is simple - fix the bug in your code!!! The reason you are experiencing problems is usually due to uninitialized variables in functions or classes. Problems like this are present in both Debug and Release builds, but typically only manifest themselves in the release binary because the debug build is alot more tolerant to errors.
2. Fix Intellisense problems
This is the most frustrating “feature” of Visual Studio - when intellisense stops working. Simply exit Visual Studio and browse to your project directory - then delete the .ncb file for your project. When you restart Visual Studio the problem will be fixed.
3. Auto-indent current selection
Press Alt+F8 on any highlighted text in the code-editor, and the code will be automatically adjusted so that each line is at the correct indentation level. Selecting an entire function body properly indents each line within the function.
4. Define custom keywords
Visual C++ has the ability to highlight user-defined keywords in your code. The colour of these user-defined keywords is easily adjusted using the Options dialog, but adding user-defined keywords is not documented.
Simply create a file called " usertype.dat" in your C:\Program Files\Microsoft Visual Studio\Common\MSDev98\Bin directory (the same directory that contains MSDEV.EXE). The contents of this file is a series of custom keywords, each one on a separate line. These keywords do not need to contain the built-in types such as int, char etc - only additional keywords that you want highlighted.
Here is the usertype.dat I use on my development machine. This same tip applies to Visual Studio.NET - look in the C:\Program Files\Visual Studio.NET\Common7\IDE directory (where DEVENV.EXE lives) and place your usertype.dat file there.
5. Define custom colours in the IDE
The Visual C++ IDE only allows you to select from 16 different colours. If you are fussy about the these colours then you can modify the base 16 colours from the following registry location:
HKCU\Software\Microsoft\Devstudio\6.0\Format\Source Window\
Inside this key there are a series of binary data items, one for each user-definable entity in the source window - such as comments, keywords, strings and normal text. Each value is made up using the same format. The first four bytes are the foreground colour, in RGBA format (3 bytes for RGB and 1 byte for padding). The background colour follows immediately afterwards using the same format:
[RR GG BB xx][RR GG BB xx]
  Foreground  Background
You can use the Registry Editor to Export and Import your colour settings from machine-to-machine.
6. Column-based selection
The Visual studio editor lets you select text in a line-by-line manner. However, holding the ALT key down whilst making a selection with the mouse causes columns of text to be selected rather than rows (lines).s
7. View structure members
Position the cusor next to the same of a structure variable and press CTRL+SPACE. The structure members popup window will appear.
8. View function parameters
Position the cursor on/after the name of a function and press CTRL+SHIFT+SPACE. The function-parameters popup window will appear.
9. Display Disassembly
Whilst debugging a project, press ALT+8 to switch to assembler mode.
10. Find Definition of any identifier
Right-click the mouse on any variable, function, structure or macro. A popup menu will appear - select " Goto Definition Of". Usually an error box will appear stating that you need to rebuild your project with browse information. Click YES, and wait for the project to rebuild. Now when you “Goto Definition Of”, Visual C++ will open the appropriate source / header file and jump to the line containing the definition of the item you just selected.
11. Bookmark lines of text
You can bookmark lines of text for further reference, using the “Mark” commands. Press Ctrl+F2 to mark/unmark a line of text. Press F2 to skip between marked positions within each source-file.
The list of current bookmarks can be displayed by the Edit -> Bookmarks dialog or by pressing ALT+F2.
12. Callgraphs
Position the cursor over any function name and hit ALT+F12. If your project was built with browse-information, a dialog will appear asking what you want to do. Select CallGraph to view a hierarchy of all sub-functions which are called by your function. This is a very useful feature often overlooked in Visual Studio.
13. Navigate around your source quickly
Hold down Control whilst using the Arrow Keys to make the cursor skip between words, rather than moving character-by-character.
14. Find corresponding brackets
Position the cursor over any “{”, “[”, “(”, “}”, “]” or “)” bracket and hit CTRL +"]". The cursor will move to the corresponding opening/closing bracket of that expression.
15. Show/Hide whitespace
Press CTRL+SHIFT+8 to show / hide whitespace markers.
16. Open header files
Right-click any filename in your source-code (i.e. in a string expression or #include line) and click " Open Document". Visual Studio will open the corresponding file in the IDE.
17. Installing Platform SDK
The simplest method to install a new SDK or DDK is to install the entire package to a new location on your hard-disk (rather than install over the old one). I always recommend storing SDKs and MSDN help libraries in a “simple” directory location so it is easy to browse to using the command-prompt. i.e.
C:\MSVS\SDK2004\
C:\MSVS\MSDN2004\
When you want to integrate this new SDK into Visual C++, bring up the Tools->Options dialog box, and select the " Directories" tab. There is a drop-down list which lets you entire directories for Include files (*.h) and Library files (*.lib). Enter a new directory location for the following paths and move them to the top of their respective lists:
C:\MSVS\SDK2004\Include
C:\MSVS\SDK2004\Lib
When Visual C++ compiles your project, it first searches the specified directories for include and library files. By putting the new directories at the top of the list it searches those first, before resorting to the “default” locations.
18. Preserve Keyboard and Layout settings
Visual Studio’s keyboard and layout settings are stored in the following locations:
HKEY_CURRENT_USER\Software\Microsoft\DevStudio\6.0\Keyboard
HKEY_CURRENT_USER\Software\Microsoft\DevStudio\6.0\Layout
Use REGEDIT to Export these registry locations to an external file, then simply Import the settings when you need them on any new machine.
19. Using MAP files
You can see exactly what functions and global variables have been compiled into your project by looking at the corresponding MAP file in your /Debug or /Release directory. To enable this feature, open the Project->Settings dialog and select the " Linker" tab. Make sure the " Generate Map File" checkbox is selected.
20. Generate assembly-language output
You can see the full assembly language output of your project (complete with corresponding source-line and op-code output). Open the Project->Settings dialog and select the " C/C++" tab. Select the " Listing Files" option from the drop-down list and then select what type of output you want. The resulting file is generated in your /Debug or /Release directory.
21. Tiny Executables!
Generate instantly smaller executables by performing the following steps:
- Open the Project Settings dialog from the Project menu.
- Select the C/C++ tab
- Select Code Generation from the Category combo-box.
- In the Use run-time library drop-down-list, select:
Debug Multithreaded DLL for Debug builds Multithreaded DLL for Release builds
Now add the following line to the top of your main source file and you will have instantly smaller exes:
#pragma comment(linker, "/OPT:NOWIN98")
22. Breakpoints Dialog
It is very easy to miss the Breakpoints dialog from the Edit menu (what a strange place to put it!).
However some very powerful debugging can be achieved. Set breakpoints when specific variables change in value, when a Window procedure is called with a certain window-message, or when other conditions are met.
23. Edit Executable Resources
Visual Studio is a fully functional binary resource editor. Simply open an executable or dll using the File->Open dialog, but before pressing OK, select the " Resources" option in the " Open** As**" drop-down-list. You can use this feature to edit menus, dialogs, strings and bitmaps in regular executables and dlls such as notepad, paint, wordpad etc.
24. Display Workspace window
Press Alt+0 (Alt+zero) at any time to bring up the Project Workspace window.
25. Debug Release Builds
It is possible (and usually desirable) to generate debug information for your release builds. This is advantageous because you can now debug problems that only manifest themselves in a release-build environment. You can do this in such a way that the debug information is not stored inside the executable (thus bloating it up) - instead, it is stored in a separate .pdb (program database) file. The only entry in the executable is a small string which directs the debugger to your program database, so you can distribute the executable without this sensitive information.
Select " Link" from the Project->Settings dialog, and then select " Debug" from the Category drop-down list. Make sure that the " Debug Info" checkbox is selected, and then enable " COFF Format".
Now for any source-file that you want debugging information generated for, select that file (or your entire project) in the Project->Settings dialog, and then make sure that the “Program Database” option is enabled in the C/C++ General-settings tab.
26. Warning Level 4
Catch more errors in your project by enabling " Warning Level 4" in the C/C++ General settings tab.
27. Console and Window applications
You can switch between Console and Win32 applications at any time by editing the Linker options manually in the “Project Options” edit-field under the Project->Settings->Link dialog. Edit the /SUBSYSTEM option to switch between console and gui builds. i.e.
/SUBSYSTEM:CONSOLE
/SUBSYSTEM:WINDOWS
28. Generate Browse Information
Select Generate Browse Info under the C/C++ project settings tab, for any source-files that you want to be included. This is very useful for searching for function definitions and declarations - just right-click a function / variable and select “Goto Definition Of…” and the IDE will take you straight there.
29. Visual Studio Debugger - Watch Window
There are many useful commands available in the watch window, which can alter the way variables and error values are displayed by the debugger.
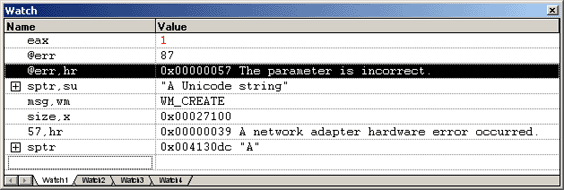
| Command | Description |
|---|---|
| eax | Displays the return value of a function after it returns. |
| @err | Display the current Win32 GetLastError value |
| string, su | Display the specified string as Unicode. |
| value, hr | Treat the specified value as a HRESULT and display it’s string representation |
| value, wm | Decode the specified value as a Windows Message. |
| value, x | Display value in Hexadecimal |
| array, 23 | Display exactly 23 elements of the specified array |
| address, mb | Display the specified address/variable as a memory-block hex-dump. |
30. Avoid stepping into CRT functions
The reason the Visual Studio debugger steps into CRT functions (i.e. into new/delete) when you don’t want it to, is because you installed the source-code to the CRT/MFC libraries. Either move the source-code to a different location, or prevent the Visual Studio debugger from stepping into specific functions (whilst pressing F11) by performing the following steps:
Open
AUTOEXP.DAT(from theCOMMON\MSDEV98\BIN\directory)Add a section called
[ExecutionControl]Add a line in this section with the following format:
functionName=NoStepIntoclassName::*=NoStepIntoRestart the IDE for the changes to take effect.
Of course as soon as you accidently step into a function that you didn’t want to be in, simply press SHIFT+F11 to step out again.