Scrollbars & Scrolling
17 minute read •
Welcome to the third installment of the “Design and Implementation of a Win32 Text Editor” article series! In this part we will look at adding scrollbars and scrolling to our TextView control.
Scrolling in Win32
In Windows, scrolling is divided into three areas: The first is the physical scrollbars, whether they be scrollbars built into a window, or separate scrollbar controls. There is a complete scrollbar API to set and retrieve the positional information described by a scrollbar - GetScrollPos , SetScrollInfo etc.
The next area is the window-messages that scrollbars send to their parent window when they are manipulated by the user - i.e. the WM_VSCROLL and WM_HSCROLL messages. These special scrolling messages can be used by an application to update it’s user-interface in response to the user’s interactions.
The last category is the GDI scrolling API - i.e. ScrollWindow and ScrollWindowEx. Although they are grouped in the same category as the “regular” scrollbar API in the Platform SDK, these two GDI routines don’t have anything to do with scrollbars - instead they are used to move/offset a bitmap region within a window to give the illusion of scrolling.
We will have to bring all these areas together to implement full scrolling support in our TextView control.
Scrollbars - built in or separate?
The first thing I want to discuss before we start is what type of scrollbar to use. We have two choices - “built-in” scrollbars which would be part of the TextView’s non-client window area, or separate scrollbar controls.
There isn’t much difference between the two types. With built-in scrollbars, the WM_xSCROLL messages are sent to the same window to which the scrollbars belong. With separate scrollbar controls, the scrollbar messages get sent to the control’s parent window. However it would be very simple to forward the scrollbar messages from a parent window to the real TextView window, so this wouldn’t be any kind of set-back.
The real difference comes when we have to position our TextView control, because the scrollbar controls have to be carefully positioned at the same time to make sure they are aligned correctly at the bottom/right edges of the TextView. We would probably delegate this task to a “container” window which managed the layout of a single TextView and it’s associated scrollbars.
Whilst separate scrollbar controls can provide additional flexibility (we can add grippers, buttons etc alongside the scrollbars), the extra work involved would detract from the task at hand. So for the time being the TextView will use normal built-in scrollbar controls - however later on in the tutorial series we will look at how to utilize separate controls because it is actually very simple, but just a little tedious to be concerned with at the moment.
Scrollbar settings
A scrollbar’s state (i.e. it’s range and current thumb position) is set using the SetScrollInfo API, using a SCROLLINFO structure to specify each attribute. This structure is shown below:
struct SCROLLINFO
{
    UINT cbSize;
    UINT fMask;

    int nMin;
    int nMax;
    int nPage;
    int nPos;
};
The diagram below illustrates these four scrollbar properties and how they relate to each other. For the sake of this small example, the data range that the scrollbar represents is 100 lines. Although I’ve used a picture of a horizontal scrollbar, a vertical scrollbar is no different in operation.
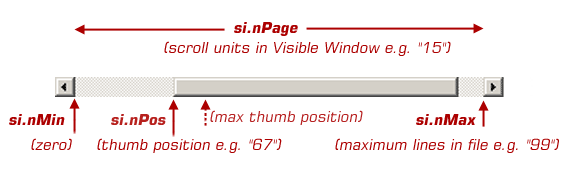
The nMin and nMax values represents the total number of “scrolling units” (or lines) that the scrollbar contain. For our TextView, we would set nMin to be zero as it makes no sense to allow scrolling to negative line numbers. nMax must be the total number of lines in the text document, minus one - in the case of our “100 line file”, nMax must be 99.
The nPos value represents the current scrollbar position, in “scrolling units”. This is not a pixel or coordinate based value, rather it is an arbitrary value somewhere within the range nMin...nMax.
This leaves us with the “odd one out” - nPage. This value has nothing to do with the scrolling range, the number of lines in a file or the current scrollbar position. It is used purely to specify how many scrolling units there are in the current window client-area. For example, if our window was big enough to hold 15 lines of text, then we would set nPage to equal 15. The built-in scrollbar will use this value to work out how big to make the scrollbar thumb - at no time do you have to do anything complicated to work out how big the thumb should be.
Note that the maximum thumb position will never equal nMax because the thumb width prevents it from reaching this far. Therefore we have two “maximum” values that relate to our scrollbar - what the scrollbar requires for it’s si.nMax value, and what results as the thumb position maximum value - which is always nPage units less than the scrollbar’s nMax.
Adding scrollbars to a Window
Adding scrollbars to a window is very simple - all we have to do is add the WS_HSCROLL and WS_VSCROLL window styles, which we can do when we create the window:
CreateWindowEx(WS_EX_CLIENTEDGE, TEXTVIEW_CLASS, 0, WS_VSCROLL | WS_HSCROLL ...
Before we can do anything useful with our scrollbars we must create some variables which will represent the “scrollbar state” for TextView C++ class:
class TextView
{
...
    ULONG m_nVScrollPos;
    ULONG m_nHScrollPos;

    ULONG m_nVScrollMax;
    ULONG m_nHScrollMax;
    int m_nWindowLines;
    int m_nWindowColumns;
    ULONG m_nLongestLine;
    ULONG m_nLineCount;
};
These variables (when initialized) will allow us to take into account the current scrollbar position when we are drawing our lines of text into the display.
m_nVScrollPosandm_nHScrollPos
Represents the vertical and horizontal scrollbar thumb positions.
m_nVScrollMaxandm_nHScrollMax
Represents the maximum values that the scrollbar thumb positions can reach (not the maximum number of columns/lines in the file).
m_nWindowColumnsandm_nWindowLines
Stores the width and height (respectively) of the client area.
m_nLongestLineandm_nLineCount
Hold the real text-file “dimensions”.
Note that the m_nLongestLine variable has been introduced. This is used to represent the maximum horizontal scrolling extent. It should be obvious why we need to use the longest line in the text document to determine this horizontal scrolling range, and not some arbitrary fixed value.
ULONG TextDocument::longestline(int tabwidth);
The TextDocument has been given the task of calculating the width (in logical text units) of the longest line. The current tab-width setting must be specified so that tab characters can be taken into account. I won’t include the code necessary to perform this task - just take a look at the sourcecode download.
Configuring the scrollbars
Repeated Win32 projects have taught me that scrollbars only really need to be setup in one place in a program - during a window-size change. A single function can be used to setup both the horizontal and vertical scrollbars at the same time:
VOID TextView::SetupScrollbars()
First of all a SCROLLINFO structure is configured to set the vertical scrollbar properties:
VOID TextView::SetupScrollbars()
{
    SCROLLINFO si = { sizeof(si) };

    si.fMask = SIF_POS | SIF_PAGE | SIF_RANGE | SIF_DISABLENOSCROLL;
    si.nPos = m_nVScrollPos; // scrollbar thumb position
    si.nPage = m_nWindowLines; // number of lines in a page (i.e. rows of text in window)
    si.nMin = 0;
    si.nMax = m_nLineCount - 1; // total number of lines in file (i.e. total scroll range)

    SetScrollInfo(m_hWnd, SB_VERT, &si, TRUE);
...
The horizontal scrollbar is configured in a very similar way:
...
    si.nPos = m_nHScrollPos; // scrollbar thumb position
    si.nPage = m_nWindowColumns; // number of columns in the window
    si.nMin = 0;
    si.nMax = m_nLongestLine - 1; // width of longest line (i.e. total scroll range)

    SetScrollInfo(m_hWnd, SB_HORZ, &si, TRUE);

...
The very last thing to do is calculate the maximum positions that the scrollbar thumbs can take:
...
    m_nVScrollMax = m_nLineCount - m_nWindowLines;
    m_nHScrollMax = m_nLongestLine - m_nWindowColumns;
}
It is important that you understand these last two lines. The m_nVScrollMax and m_nHScrollMax values are not used to set the scrollbar’s si.nMax properties - the m_nLongestLine and m_nLineCount are used for this purpose. Instead, the m_n_XScrollMax values represent the maximum thumb positions - much more useful for our purposes because we will use these values alot in the TextView.
Window size affects scrolling range
The first thing we must understand is that whenever we resize our TextView control, the amount of visible text within that window will change, and therefore the scrollbar’s nPage value must change to reflect this. Therefore when our TextView window resizes we can react to the WM_SIZE message that is received:
case WM_SIZE:
    return tvp->OnSize(LOWORD(lParam), HIWORD(lParam));
LONG TextView::OnSize(int width, int height)
{
    m_nWindowLines = min(height / m_nFontHeight, m_nLineCount);
    m_nWindowColumns = min(width / m_nFontWidth, m_nLongestLine);

    if(PinToBottomCorner())
        RefreshWindow();

    SetupScrollbars();
}
The first two lines simply work out how many lines/columns of text there are in the window. The min() function is used to handle the case when the window can display more text than there is available (i.e. when the entire file fits within the window).
Once these two values have been calculated the scrollbars can be configured using the SetupScrollbars function we wrote above. This leads us onto the next question:
What is “Pinning” ?
Imagine the following scenario. We have loaded a text document and scrolled right the way down to the bottom. We then drag the bottom window-border down to make the window larger. The question is, what happens to the file contents when we do this? We have two options to choose from, both of which are acceptable:
Do we leave the current scrollbar position intact and expose “void” space at the end of the file? This option would not affect the file’s position - i.e. it would remain static. Some people prefer this because the text display remains in the same place on the screen.
The other option is to drag the file contents down at the same time (exposing more content at the top of the window), adjusting the scrollbar position at the same time, so that we always have a window full of text - in effect, “pinning” the file-content to the bottom edge of the window’s client-area.
Have a look at the regular notepad utility and see what it does - you will find that it (or rather, the standard multi-line edit control) “pins” it’s content to the bottom-right corner of the control when the control is resized. This is the behaviour that we will use in our edit control.
bool TextView::PinToBottomCorner()
{
    bool repos = false;

    if(m_nHScrollPos + m_nWindowColumns > m_nLongestLine)
    {
        m_nHScrollPos = m_nLongestLine - m_nWindowColumns;
        repos = true;
    }

    if(m_nVScrollPos + m_nWindowLines > m_nLineCount)
    {
        m_nVScrollPos = m_nLineCount - m_nWindowLines;
        repos = true;
    }

    return repos;
}
The function above simply adjusts the scrollbar position to make sure that it is always within the scroll-range, and returns a boolean value to indicate if anything changed - so we know if we need to redraw the window or not.
Note that the alternative (exposing empty space at the end rather than dragging the file down) would also be acceptable - in fact this is what Visual Studio and many other editors do. We might look at adding this behaviour as an optional extra later on in the series. Personally I prefer the “pinning” method much more so that’s what I have implemented first of all.
Taking the scrollbar position into account when drawing
Currently our text-display is quite primitive because no scrollbar information is used when painting the display. Subsequently the text-file is firmly rooted to the top-left of the TextView client-area and we have to drag the window larger if we want to see more text. Fortunately very little work is required to make our TextView fully scrollable.
If you remember from the last tutorial, the TextView::OnPaint routine calculated the first and last rows of text to update using a simple formula:
first = ps.rcPaint.top / m_nFontHeight;
 last = ps.rcPaint.bottom / m_nFontHeight;
It is a simple matter to take the vertical-scrollbar position into account:
first = m_nVScrollPos + (ps.rcPaint.top / m_nFontHeight);
 last = m_nVScrollPos + (ps.rcPaint.bottom / m_nFontHeight);
Basically what this does is change the line-index that we draw, so as the scrollbar moves down, the lines of text effectively move up the display. We still draw lines at the same physical location within the window, but we draw different lines to give the illusion that we are scrolling through the document.
Now that we can correctly identify which logical line of text needs updating, we can look at the actual text-output.
void TextView::PaintLine(HDC hdc, ULONG nLineNo)
{
    RECT rect;
    GetClientRect(m_hWnd, &rect);

    // calculate rectangle for entire length of line in window
    rect.left = -m_nHScrollPos * m_nFontWidth;
    rect.right = rect.right;
    rect.top = (nLineNo - m_nVScrollPos) * m_nFontHeight)
    rect.bottom = rect.top + m_nFontHeight;

    // rest of function body omitted

    // draw text and fill line background at the same time
    TabbedExtTextOut(hdc, &rect, buf, len);
}
First of all understand the horizontal text-positioning - the rect.left and rect.right values: When the horizontal scrollbar’s position is increased (i.e. we scroll to the right), we would expect the page to scroll to the left. So as the scroll position increases, the text position must decrease. This is why the “-m_nHScrollPos " is used. This logical text position is then multiplied by the current font-width to produce a pixel-based coordinate that can be used for drawing. This is ideal for fixed-width font displays.
The right-most edge of the line of text must still be fixed to the right-edge of the window, so this value is left unchanged. This basically results in the following occurance: As we scroll to the right, the length of text that we draw gets larger and larger because the starting x-coordinate becomes more and more negative. If the device-context didn’t clip our output, lines of text would look something like this:
Of course, instead of offsetting our drawing to the left, we could have simply used the horizontal scrollbar position to find the correct place to draw within the line of buffered characters, and (sensibly) do all drawing from a fixed x-coordinate of zero. This would work well for our simple text display. However “tabbed” text display poses a problem, and once we start more complex syntax colouring and variable-width fonts, this quickly becomes a poor choice. I am undecided at present what the best method is to handle the horizontal scrolling so we will use this simple method for now.
Now onto the vertical scrollbar position. Because our PaintLine function is being supplied with a “logical” line number ( nLineNo ) - which is relative to the start of the document - we must subtract the vertical scrollbar’s position from this value to arrive at a zero-based index, relative to the top of the client-area. This value is then multiplied by the font’s height to provide a pixel-based y-coordinate.
Scrollbar Messages
We are now at a point where we are ready to add real scrolling to the TextView. We will concentrate just on the WM_VSCROLL message, as the WM_HSCROLL handler is virtually identical. If you look at the Platform SDK documentation for WM_VSCROLL, it states that low-order WORD of wParam contains the scrolling code. This can be one of the following values: SB_TOP, SB_BOTTOM, SB_LINEUP, SB_LINEDOWN, SB_PAGEUP, SB_PAGEDOWN etc. Basically, it tells us which part of the scrollbar has been clicked by the mouse.
We’ll start by looking at the SB_TOP and SB_BOTTOM messages. The handler for the vertical scrollbar will look like this:
LONG TextView::OnVScroll(UINT nSBCode, UINT nPos)
{
    switch(nSBCode)
    {
    case SB_TOP:m_nVScrollPos = 0;
        RefreshWindow();
        break;

    case SB_BOTTOM:m_nVScrollPos = m_nVScrollMax;
        RefreshWindow();
        break;

    ...
    }

    // update the scrollbar metrics
    SetupScrollbars();
    return 0;
}
The SB_TOP and SB_BOTTOM cases are incredibly simple. All that is required is for us to move the scroll position to either extreme of the scrolling range, and then redraw the entire window to reflect the change.
Reacting to the scrollbar “thumb” messages is also very simple:
case SB_THUMBPOS: case SB_THUMBTRACK:
        m_nVScrollPos = GetTrackPos32(m_hWnd, SB_VERT);
        RefreshWindow();
        break;

    ...
The GetTrackPos32 is just a simple wrapper function around GetScrollInfo :
LONG GetTrackPos32(HWND hwnd, int nBar)
{
    SCROLLINFO si = { sizeof(si), SIF_TRACKPOS };
    GetScrollInfo(hwnd, nBar, &si);
    return si.nTrackPos;
}
This is required because we want the full 32bit scrollbar value rather than the 16bit position that we get from the WM_VSCROLL message.
The remaining four cases (SB_LINEUP, SB_LINEDOWN, SB_PAGEUP and SB_PAGEDOWN) are slightly different:
case SB_LINEUP:
        Scroll(0, -1);
        break;

    case SB_LINEDOWN:
        Scroll(0, 1);
        break; case SB_PAGEUP:
        Scroll(0, -m_nWindowLines);
        break; case SB_PAGEDOWN:
        Scroll(0, m_nWindowLines);
        break;

    ...
As you can see we have deferred the real work to a private scrolling function, which we will implement in just a moment:
VOID TextView::Scroll(int dx, int dy);
This function takes two signed integer parameters. Their purpose is to specify the direction and amount (in text units) in which to scroll the viewport. If you look at the message-handlers for SB_LINEUP/DOWN, you can see that to scroll up, we specify a value of -1, and to scroll down we specify a value of 1. Similarly, for SB_PAGEUP/DOWN, we scroll up/down by an entire page’s worth of text (i.e. the number of lines currently in the window). We will let the Scroll function take care of making sure that we never scroll off the start/end of the document.
Scrolling the Viewport
Scrolling has been isolated inside a single function call. This has a number of advantages - understanding these will help you develop better programs in the future. The first (and most obvious) advantage is the modular design benefits it brings. We will be able to re-use the scrolling function in many other areas of the control (we have already used it twice for the vertical+horizontal scrollbar messages), but we will also make good use of this function when it comes to keyboard and mouse scrolling.
The biggest advantage is not at first obvious, but greatly simplifies our design. By designing a scrolling function that can pan the display around in two directions at once (horizontal and vertical) we can greatly enhance the mouse-scrolling interactions. Many controls resort to sending two scrolling messages simultaneously - one to scroll up/down, and one to scroll left/right. This has the potential to introduce scrolling glitches and artifacts, and is also a little clumsy in operation.
VOID TextView::Scroll(int dx, int dy)
{
    // make sure dx,dy don't scroll past the end of the document!

    // adjust the scrollbar thumb position
    m_nVScrollPos += dy;
    m_nHScrollPos += dx;

    if(dx != 0 || dy != 0)
    {
        // perform the scroll
        ScrollWindowEx(
            m_hWnd,
            -dx * m_nFontWidth,
            -dy * m_nFontHeight,
            NULL,
            NULL,
            0, 0, SW_INVALIDATE
           );

        SetupScrollbars();
    }
}
The function above is not quite complete - it is missing some important logic to ensure that dx and dy never allow us to scroll outside the boundaries of the current file. The source-code download does include this code however.
All that I really wanted to show was the the ScrollWindowEx API to update the display. The TextView::Scroll function is very simple at the moment but it does work well - i.e. it scrolls the window smoothly with no flickering. We will revisit this function in the next tutorial when we look at selection-scrolling with the mouse.
MouseWheel support
Whilst we are looking at scrolling we may as well implement support for mouse-wheel scrolling because it is incredibly simple to do. The WM_MOUSEWHEEL message was added with Windows 98 and Windows NT4 to implement mouse-wheel scrolling. In order to support this message we will need a new-ish Platform SDK installed, and we must also define the _WIN32_WINNT variable before #including <windows.h>, so that the message is available for us to use.
Our handler for WM_MOUSEWHEEL simply extracts the wheel-rotation delta (i.e. the forwards/backwards vector) and calls the real message-handler in our TextView class:
case WM_MOUSEWHEEL:
    return ptv->OnMouseWheel((short)HIWORD(wParam));
The handler uses the SPI_GETWHEELSCROLLLINES system-setting to work out how many lines to scroll:
LONG TextView::OnMouseWheel(int nDelta)
{
    int nScrollLines;

    SystemParametersInfo(SPI_GETWHEELSCROLLLINES, 0, &nScrollLines, 0);

    if(uScrollLines <= 1)
        uScrollLines = 3;

    Scroll(0, (-nDelta/120) * uScrollLines);
}
That’s all it takes, because we have made good use of the Scroll function we developed to do the hard work. See, I told you it would be useful ;-)
Coming up in Part 4
I hope you will take the time to download the zipfile at the top of this tutorial and have a play with the latest incarnation of Neatpad. For such a small amount of code it is quite a useful tool already - it is a pretty effective text-document viewing application. Of course large files aren’t handled at all but it should give you a good idea about where to proceed.
Mouse support will be the aim of the next tutorial. We will look at how to add focus and text-caret support, caret positioning with the mouse, and full text selection. This will require modifications to the drawing code of course. We will also implement “mouse scrolling” - i.e. where the text selection is extended beyond the window and the contents must be scrolled into view. The scrolling work we have done so far will make this task very simple.
 neatpad3.zip