Loading a text file
11 minute read •
Introduction
This is the second part of the “Design and Implementation of a Win32 Text Editor” article series. If you haven’t already read part 1 then please do so now!
OK, so assuming you’ve downloaded, assimilated and compiled the source code that was made available, you should have a basic skeleton text editor which doesn’t do anything yet. Our mission in part 2 is to load a text file into memory and display it in our TextView control. But let’s not get carried away. The only aim right now is to load a text file and provide very basic display, we are nowhere near providing scrolling or keyboard and mouse support.
Text Documents
A Text Document is nothing more than a basic binary file, with the commonly understood convention that a text-file should not contain unprintable characters (i.e. ASCII control characters), and that lines of text are separated by a common end-of-line delimiter (such as a carriage-return / line-feed pair).
It is the task of a Text Editor to interpret a text-file’s binary content and display this content in a line-oriented manner to the user. Part one of this tutorial series discussed the structure of a Text Editor - and described the TextView and TextDocument objects. The first thing we will concentrate on will therefore be the TextDocument object - which we will represent as a C++ class:
class TextDocument
{
public:
    bool init(char *filename);

    ULONG getline(ULONG lineno, char *buf, size_t len);
    ULONG linecount();

private:
    bool init_linebuffer();
    char *buffer;
    int length;
};
The basic C++ interface is very simple. We can load a file into the TextDocument using the init class member. We can retrieve a line of text using the getline method - where we specify a line number and a buffer into which to store the line contents.
Notice that the TextDocument class is entirely ASCII in operation at the moment - that is, there is no support for Unicode. We could have used C++ templates to support a variety of different types. However at this moment in time I am still undecided as to how best approach this problem, so we will leave the interface as simple as possible. After all, this is a “throw-away” implementation of TextDocument, and we will completely re-write it later on in the series.
Loading a text file
Our first attempt at loading a text file will try to be as simple as possible. The TextDocument::init function below is the main interface to the TextDocument:
bool TextDocument::init(char *filename)
{
    HANDLE hFile;
    hFile = CreateFile(filename, GENERIC_READ, FILE_SHARE_READ, 0, OPEN_EXISTING, 0, 0);

    if(hFile == INVALID_HANDLE_VALUE)
        return false;

    return init(hFile);
}
TextDocument::init simply opens a file using the standard win32 CreateFile API, and then passes control to a helper function which loads the file contents using the HANDLE returned by CreateFile:
bool TextDocument::init(HANDLE hFile)
{
    ULONG numread;

    if((length = GetFileSize(hFile, 0)) == 0)
        return false;

    // allocate new file-buffer
    if((buffer = new char[length]) == 0)
        return false;

    // read entire file into memory
    ReadFile(hFile, buffer, length, &numread, 0);

    // work out where each line of text starts
    init_linebuffer();

    CloseHandle(hFile);
    return true;
}
As you can see loading a file is very simple. We calculate how big the file is, allocate a buffer to hold the text, and then read the file into memory. This is not really a very smart thing to do, as large files will take a very long time to load, or may fail to load completely if there isn’t enough memory available.
Please understand that this is a “throw-away” TextDocument class. Writing a TextDocument class which supports files of any size will be very difficult so I have deliberately kept this version of TextDocument as simple as possible. Later on in the series we will revisit file-loading and write this class properly.
Carriage-returns and Linefeeds
How many lines are there in a text document? How do we read a file line-by-line? The answer really depends on how you define what a line of text is. At it’s simplest, a line of text is a sequence of characters within a file, with well-defined end of line marker. We don’t really care what the characters are in each line, but we do need to know how to identify where the start and stop of each line is.
There are three main conventions for delimiting lines of text - under DOS and Windows, a carriage-return / line-feed pair is used. Under UNIX and Linux, a single line-feed character is used, and under Macintosh operating system, a single carriage-return is used. There are a number of issues which become apparent once we try to tackle all these cases, but for now we will just concentrate on the DOS/Windows case. A future tutorial will address the other last two options (and another case, where we can encounter a file with all combinations of line-separators).
The TextView control needs to know now many lines of text there are in it’s document, because it must be able to setup the scrollbars to reflect the document length. We also need to be able to locate individual lines of text in a random order because we will be drawing the text document line-by-line.
The most common solution to this problem is to implement what is known as a “line buffer”. Conceptually the line buffer is very simple - it is just an array of integer offsets which specify where each line of text in the document starts.
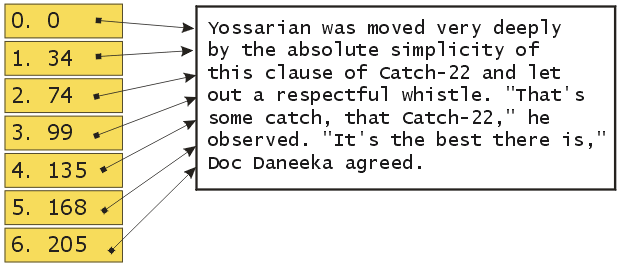
The diagram above illustrates a line-buffer on the left hand side. The buffer has been initialized with the block of text on the right - by processing the text, searching for carriage-return / line-feed sequences, and recording the offset for each line. Each array item (numbered 0-6) contains the offset of the character which starts each line of text.
The TextDocument will implement the line-buffer as it seems a natural choice to perform line-parsing in the same place as the file loading. The TextDocument::init_linebuffer function below is called when a new file is loaded:
bool TextDocument::init_linebuffer()
{
    ULONG i = 0;
    ULONG linestart = 0;

    // allocate the line-buffer
    if((linebuffer = new ULONG[length]) == 0)
        return false;

    numlines = 0;

    // loop through every byte in the file
    for(i = 0; i < length; )
    {
        if(buffer[i++] == '\r')
        {
            // carriage-return / line-feed combination
            if(buffer[i] == '\n')
                i++;

            // record where the line starts
            linebuffer[numlines++] = linestart;
            linestart = i;
        }
    }

    linebuf[numlines] = length;
    return true;
}
The init_linebuffer function does two things: allocate space for the line buffer, and then process the file. Because we don’t know how many lines of text there will be until we process the entire file, how do we know how big to make the line-buffer? The short answer is, we can’t possibly know this. A real TextDocument class would either dynamically reallocate it’s line-buffer as it encountered more lines, or use some clever algorithms to limit the amount of memory consumed by the line-buffer.
For now we will cheat and make the linebuffer the same size as the file itself - this way we know we won’t run out of space. Processing the file requires us to loop through each and every byte in the file, looking for a carriage-return character.
The algorithm itself is straight-forward. Whenever a carriage-return is encountered (followed by an optional line-feed), a new entry is added to the end of the linebuffer, which records the current start-of-line. The linestart variable is then made to “point” to the character after the carriage-return - the start of the next line. This continues until there are no more characters left in the file. The number of lines processed is kept updated in the numlines variable.
Retrieving lines of text
Now that our TextDocument implements a rudimentary line buffer, line-based lookups will be very fast. The following TextDocument::getline function shows how we will access each line of text from the TextDocument:
ULONG TextDocument::getline(ULONG lineno, char *buf, size_t len)
{
    char *lineptr;
    ULONG linelen;

    // find the start of the specified line
    lineptr = buffer + linebuffer[lineno];

    // work out how long it is, by looking at the next line's starting point
    linelen = linebuffer[lineno+1] - linebuffer[lineno];

    // make sure we don't overflow caller's buffer
    linelen = min(len, linelen);

    memcpy(buf, lineptr, linelen);

    return linelen;
}
The function works by using the lineno parameter as a direct index into the linebuffer array. The offset stored in linebuffer[lineno] is added to the real buffer of text, resulting in a pointer to the start-of-line. The length of the line (in characters) is calculated by subtracting the next line’s offset from the current line’s. Once the correct offset and length have been calculated, the raw line content is copied into the caller-supplied buffer. It’s simple but it works.
char buf[200];
m_pTextDocument->getline(5, buf, sizeof(buf));
The example above shows how to retrieve a buffer of text at line number 5.
Drawing the lines of text
The whole point of accessing the TextDocument in a line-by-line manner is to make our lives simpler when it comes to drawing the text in our TextView control.
The entire drawing and painting logic in our TextView will be centered around the WM_PAINT message. In fact, our WM_PAINT handler will be the only place in the entire program where any form of painting takes place. As with every win32 program, the painting framework starts life as a basic BeginPaint / EndPaint sequence:
LONG TextView::OnPaint()
{
    PAINTSTRUCT ps;

    BeginPaint(m_hWnd, &ps);

    // do painting
    EndPaint(m_hWnd, &ps);
    return 0;
}
The function above simply validates the device-context and returns - and because our window-class for the TextView specified that there is no background brush, not even a single pixel is displayed.
At this point, all we have is a basic drawing framework, with the update-area specified in the PAINTSTRUCT::rcPaint RECT structure. The diagram below illustrates this update rectangle in red.
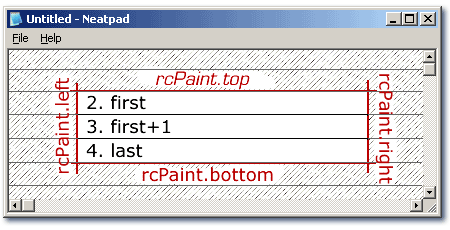
Our task is to take this single, arbitrary rectangular region and convert it into a series of horizontal spans that will be filled with lines of text. In the diagram above the update region has been split into three such spans. The variables first and last denote the first and last lines that require updating.
LONG TextView::OnPaint()
{
    PAINTSTRUCT ps;

    BeginPaint(m_hWnd, &ps);

    ULONG first, last;
    ULONG i;

    // figure out which lines to draw
    first = ps.rcPaint.top / m_nFontHeight;
    last = ps.rcPaint.bottom / m_nFontHeight;

    // draw the display line-by-line
    for(i = first; i <= last; i++)
    {
        PaintLine(ps.hdc, i);
    }

    EndPaint(m_hWnd, &ps);
    return 0;
}
The OnPaint code above is simple but effective. The first two lines we added were “first = " and “last = “. These are used to work out the starting and ending row which encompass the update region. We divide by the current font-height because we want to convert from pixels to logical lines.
Note that we have not taken into account the horizontal extents of the update region. This is deliberate, as it is simpler at this stage to draw each line in it’s entirety, and let the device-context’s update-region clip our output if we draw too much.
The individual line drawing has been deferred to separate function:
LONG TextView::PaintLine(HDC hdc, ULONG nLineNo)
{
    TCHAR buf[LONGEST_LINE];
    ULONG len;

    RECT rect;
    GetClientRect(m_hWnd, &rect);

    // work out where the line should be drawn
    rect.top = nLineNo * m_nFontHeight;
    rect.bottom = rect.top + m_nFontHeight;

    // get the data for this single line of text
    len = m_pTextDocument->getline(nLineNo, buf, LONGEST_LINE);

    // draw text and erase the entire line background at the same time
    TabbedExtTextOut(hdc, &rect, buf, len);

    return 0;
}
As you can see drawing a line of text is relatively simple. The first thing we do is work out the pixel coordinates of where to draw the line. We use the window’s client area as our starting point, and then adjust the top and bottom to describe the line as a simple rectangular region in pixel-based coordinates.
Once we have the line’s bounding rectangle we use a further helper function to draw the text - TabbedExtTextOut. I won’t include this function here - just look in the sources - suffice to say, TabbedExtTextOut is a simple wrapper function around the TabbedTextOut API, withthe added feature that it also erases any background area that is not taken up by actual text - similar to the ExtTextOut API.
The actual line of text we want to draw is retrieved from the TextDocument object using the getline method we developed earlier. It doesn’t matter if we change how we store our text-file inside the TextDocument, as long as we preserve the “getline” interface the TextView and TextDocument can be entirely separate entities.
Note that our simple text-output at this stage is exactly that - we don’t handle control characters, syntax colouring or scrolling. One step at a time though..
Coming up in Part 3
At this point we have a very simple text-viewing capability, but it is quite limited in what it can do. There is no scrolling, no keyboard or mouse input, no selection or highlighting, no colouring and no editing. Don’t let this discourage you though - it is very important that we have a simple design with which to start off with.
If you are reading this tutorial series then you probably want to see how a real text-storage component is implemented - i.e. how large files are loaded, data structures managed etc. This will be covered in a future tutorial quite soon, but for now I want to get the basic graphical interface working first.
The next tutorial will therefore look at adding scrolling support, so at least we will be able to view an entire text document. Once we have finished that, we will look at mouse input, as this will be one of the most difficult areas to implement. It will require careful coding in both the mouse and drawing routines as we have to handle cursor placement and selection highlighting at the same time.
 neatpad2.zip