Enhanced Drawing & Painting
15 minute read •
Welcome to the fourth installment of the “Design and Implementation of a Win32 Text Editor” article series! I realise that you were probably expecting a different tutorial this time around. However, it was only after starting to implement mouse selection and highlighting that I realised there wasn’t proper support in the drawing “engine”. I’ve decided to implement all of my text-output requirements in this one tutorial. So we will be covering tabbed-output, multi-coloured text (i.e. for syntax highlighting and selection highlighting) and the problem of ASCII control characters.
Example of coloured text with ASCII control characters.
Multi-coloured text
The first reason the drawing code needs revising is to support multi-coloured text. And I don’t just mean syntax colouring (which will be covered in a later tutorial). Selection highlighting is the main reason text must be drawn using different colours, simply to distinguish between selected and unselected text. The image below illustates a line of text with the middle portion selected using the default system colours.

Note that the text isn’t really selected - it is merely drawn using two different colour schemes. Just have a play with selecting this paragraph of text in whatever browser you are using, and understand that the “selection” you are making is really just a segment of text drawn in a different colour. So all we need to do for our TextView is divide up our text into the appropriate segments and call SetTextColor & SetBkColor to set the colours before calling ExtTextOut - there really isn’t any magic involved here.
A common mistake when first starting a control such as this is to try drawing the selected text in the WM_MOUSEMOVE handler, using intricate fill modes, inverted rectangles or transparent text. This really is the worst approach you could take. The next tutorial will show how to update a selection using the mouse, but all the drawing will be happening in our WM_PAINT handler.
The drawing logic must therefore be able to handle combinations of any colour - because we must think ahead about syntax and block highlighting. And because a text file does not store colour or style information, character colours must be computed separately and applied to the displayed text at runtime.
The attributes of a single character will be represented by the ATTR structure, shown below:
typedef struct{
    COLORREF fg; // foreground colour
    COLORREF bg; // background colour
    ULONG style; // font and style information
} ATTR;
Whenever a line of text is retrieved from the TextDocument, this text must be “colourised” before displaying it. Font, style and colour attributes will be computed by a separate routine, ApplyTextAttributes.
void TextView::ApplyTextAttributes( ULONG nLineNo,
                                    ULONG nOffset,
                                    TCHAR *szText,
                                    int nTextLen,
                                    ATTR *attr)
{
   // loop over each character in the text-buffer
   for(int i = 0; i < nTextLen; i++)
   {
        // apply highlight colours
        if(nOffset + i >= m_nSelectionStart && nOffset + i < m_nSelectionEnd)
        {
            attr[i].fg = GetColour(TXC_HIGHLIGHTTEXT);
            attr[i].bg = GetColour(TXC_HIGHLIGHT);
        }
        // normal text colours
        else
        {
           attr[i].fg = GetColour(TXC_FOREGROUND);
           attr[i].bg = GetColour(TXC_BACKGROUND);
        }

        attr[i].style = 0;
    }
}
This function will be called whenever some text is about to be drawn. Two parameters are passed in - nLineNo and nOffset, which describe where in the file the text occurs. ApplyTextAttribrutes will use these two parameters to determine how to “format” the text - currently as selected or unselected.
TCHAR buff[100];
ATTR attr[100];
ULONG fileoff;

// get some text from the TextDocument
int len = m_pTextDoc->getline(nLineNo, 0, buff, 100, &fileoff);

// calculate colour and font information
ApplyTextAttributes(nLineNo, fileoff, buff, len, &attr);
The formatting information is returned through the ATTR array which must be the same size as the szText buffer which holds the text. For the moment this function is sufficient to describe “normal” and “highlighted” text, but will not perform any form of syntax highlighting. I imagine that the function prototype may have to change slightly because syntax highlighting will have additional requirements.
Multi-font display
In part one of this series I wrote that I wanted to restrict the TextView to a single, fixed-width font. The entire reason for using fixed-width fonts was to keep the TextView code as simple as possible - especially the mouse-cursor placement logic. However even a fixed-width text display is not truly fixed-width, because of TAB characters which cause variable sized gaps in the lines of text. Having to deal with TABs means writing additional code to parse each line of text - to determine where in the line the mouse has been placed. My reasoning for supporting variable-width fonts is this: if we have more work to do, we may as well do it properly and handle all types of font.
In order to manage multiple fonts, we must devise a strategy to manage these fonts somehow. The FONT structure (defined below) holds a handle to a font (a normal HFONT) and also contains important information about the font’s dimensions in the TEXTMETRIC structure.
struct FONT
{
    HFONT hFont;
    TEXTMETRIC tm;

    int nInternalLeading;
    int nDescent;
};
An array of these fonts is stored as a member of the TextView class:
FONT m_FontAttr[MAX_FONTS];
int m_nNumFonts;
The first element in this array (element zero) is always the default display font. Additional fonts can be added to this array but will not be used unless some form of syntax-highlighting is developed. I only imagine variations of fonts would be used in the control (i.e. normal and bold fonts) rather than completely different styles, but the TextView will support whatever fonts you decide on.

There are some added complications which will arise from the use of multiple fonts, which are highlighted by the picture above. The problem can be divided into three cases:
- Fonts can vary in width and height. The width is not so much trouble, however fonts of different heights must be aligned so that their bases are on the same horizontal line.
- The height of a line of text is not based on a single font any more - it must be big enough to hold the tallest font currently in use.
- Smaller fonts do not fill the vertical extents of the line when painted (as can be seen above). This will require us to fill this extra “dead space” ourselves.
To solve these problems we must first understand how a font’s structure is described by GDI. The diagram below illustrates the dimensions of a font as described by the TEXTMETRIC structure:
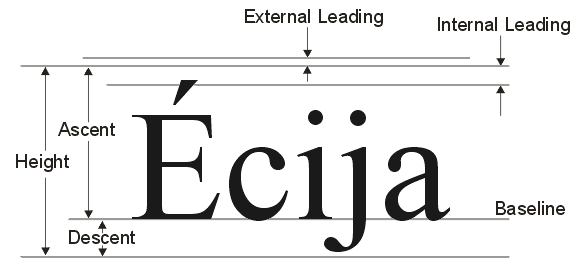
The Baseline of a font is measured by the Ascent dimension. Therefore if we keep track of the largest Ascent out of all the fonts we are using, we can work out the amount to vertically offset shorter fonts based on their individual Ascent value. For example, suppose we are using two fonts - “Courier New” with an ascent of 21, and “Lucida” with an ascent of 18. When drawing text using the Lucida font, we would have to offset this text down by 3 pixels in order to align the baselines correctly.
The second problem is easily solvable. Previous incarnations of Neatpad used the m_nFontHeight variable to keep track of the height of each line. This variable has now disappeared, to be replaced by a more meaningful value - m_nLineHeight. The TextView code demonstrates how this value is calculated in the OnSetFont member function:
LONG TextView::OnSetFont(HFONT hFont)
{
    m_nLineHeight = 0;

    for(int = 0; i < m_nNumFonts; i++)
    {
        m_nLineHeight = max(m_nLineHeight, m_FontAttr[i].tm.tmHeight);
    }
}
The final painting problem is easily solved because there is a handy API at our disposal. ExtTextOut allows us to specify a rectangular region to paint when drawing some text:
ExtTextOut(HDC hdc, int x, int y, UINT flags, RECT *rect, TCHAR szText, ...);
The x and y parameters specify where the text is to be drawn. The rect parameter specifies the background rectangle. As long as this rectangular region fills the entire height of the line we can be sure to paint the background properly.
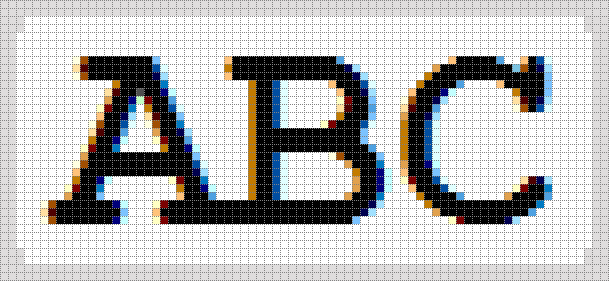
Something we must be careful with is how we tell ExtTextOut to fill the background. The ETO_OPAQUE flag can be used to achieve this effect. However, we must also specify ETO_CLIPPED as well, otherwise we will get some strange effects when using ClearType fonts. The picture above illustrates the problem - even the string length was calculated using GetTextExtentPoint32 (and the background rectangle set to this size), when ExtTextOut was called the string “bleeds” outwards by 1 pixel either side - an oddity unique to the way ClearType text is displayed. Specifying ETO_CLIPPED prevents this problem.
Line Spacing
There is something that I want to mention at this point: Many people are sometimes confused as to how the height of a font (or line of text) must be calculated. There are usually four different methods I see of obtaining a font’s height, shown below:
TEXTMETRIC tm;
GetTextMetrics(hdc, &tm);

height1 = tm.tmHeight;
height2 = tm.tmHeight + tm.tmExternalLeading;
height3 = tm.tmHeight + tm.tmInternalLeading;
height4 = tm.tmHeight + tm.tmInternalLeading + tm.tmExternalLeading;
Method #1 is correct and is what many editors utilize, because the height of a font is exactly determined by the tmHeight value. However, method #2 is more correct for a text-editor. The External Leading of a font is the value (as assigned by the font’s designer) that should be added in-between lines of text when displayed in a paragraph.
In other words, a multi-line display should use this value when displaying lines of text. The problem is, the external-leading is not taken into account when text is drawn using the standard Windows text routines (TextOut/DrawText). When a line of text is drawn using TextOut, the background is only filled to cover the tmHeight of the font and does not include the tmExternalLeading value. This results in gaps in-between lines of text, which makes people think that they are doing something wrong. The gaps between lines must be filled manually if the correct results are desired. Our multi-font display handles this extra line-spacing correctly by using ExtTextOut and enlarging the background rectangle appropriately.
As a final note, the third and fourth methods are wrong and should not be used to calculate the height of a font, or the height of a line of text. Study the diagram above to see how the various dimensions relate to each other.
As an extra feature I have also added a new message to the TextView - TXM_SETLINESPACING. This message is used to set extra spacing above and below each line of text, in addition to the font’s external leading value.
TextView_SetLineSpacing(hwndTextView, 3, 2);
The example above instructs the text-view to add 3 pixels above each line, and 2 pixels below each line (resulting in each line of text being 5 pixels taller). I think people will find this feature extremely useful, as many fonts sometimes don’t look very good unless extra line-spacing is included.
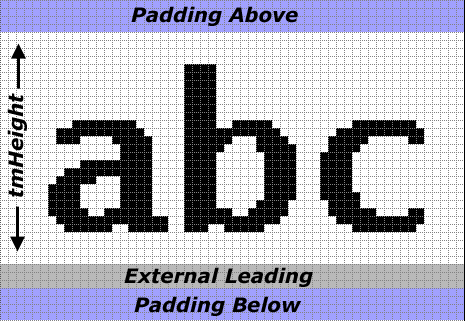
The picture above illustrates the various components of a line of text in Neatpad.
ASCII Control characters
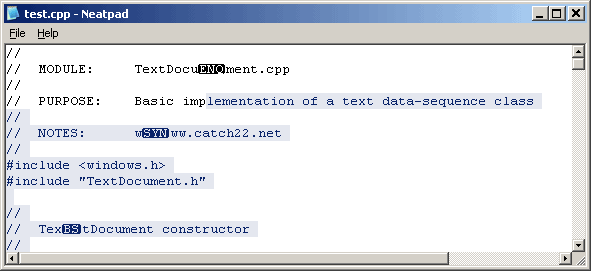
The other reason I decided to revise the drawing code was to take into account control-characters (i.e. ASCII control characters 0 - 31). Many simple text editors (such as regular Notepad) do not handle control characters at all. The NUL character (ASCII value ‘zero’) is never displayed for example - and how could it be - there is no visual representation for this character. The other control characters are equally problematic because they are designed to have function rather than appearance - a backspace or linefeed character also cannot be displayed for this reason. The solution is to duplicate what the Scintilla edit component does to display control characters:

The line of text above has two control-characters embedded it - the NUL character (value zero) and the SYN character (value 24). I’d never seen this method of displaying control-characters until I looked at Scintilla, however it does seem like a neat way of dealing with the problem. Every character in the range 0 to 31 is displayed using inverted colours, with a rectangular border to enclose the text. These “graphic/textual” representations of the ASCII control characters stand out from the surrounding text and are a great visual aid in my opinion.
Enhancing the text-output has again introduced further complexity. The “new style” control-characters are not fixed-width - the borders introduce a 4-pixel overlap which means that the display can no longer be fixed-width only. Actually it was the introduction of these control-character “bitmaps” that prompted me to switch to a fully variable-width font display.
The images that make up the control-characters will be quite complicated to draw - more so than just doing a simple “TextOut”. In an ideal world we could pre-calculate the bitmaps and store them in an off-screen buffer, and “BitBlt” them to the screen each time we needed to - this would be an efficient method to draw these characters.
Unfortunately nothing is that simple. We must be able to deal with control-characters in multiple colours (i.e. when they are selected/highlighted or part of a syntax string). We also need to take into account the different fonts, heights and styles that I want the TextView to handle. This means that our drawing code will have to be modified to deal with the occurance of ASCII control codes and handle them appropriately with a special routine DrawCtrlChar.
The basic breakdown of drawing operation is as follows (for black-on-white text):
- Fill the background white.
- Make a rectangle the width of the text and the same height as the letters.
- Draw this rectangle in black.
- Expand this rectangle 1 pixel at the top and bottom, and contract it by 1 pixel at the left and right. (i.e. make it taller and thinner by 1 pixel in each dimension).
- Draw a second black rectangle - this gives the illusion of a rounded rectangle. 6.Draw the text in white.
The TextView will of course support the option not to display control-characters this way - I can imagine some scenarios where this would be useful. In this case control-characters can be replaced by a single character ‘.’, or just drawn as best they can.
NeatTextOut
At this point we need to develop a new text-output routine which can handle drawing an aribitrary segment of text (possibly containing control-characters), in a specific font and colour. NeatTextOut (prototype shown below) is similar to TabbedTextOut, with the exception that colour and style information is supplied in the ATTR structure. This function also returns the width of the displayed text (in pixels) so that the calling function can keep track of where to draw (and also when to stop drawing when the text goes outside the window).
int NeatTextOut( HDC hdc,
                 int xpos,
                 int ypos,
                 TCHAR *szText,
                 int nLen,
                 int nTabOrigin,
                 ATTR *attr
               );
I really don’t see the value of including the source-code here for you to see, because it is obviously included in the TextView class and is fully documented for you to see there. Suffice to say, if you don’t want to support control-characters you can quite easily replace this function with a normal TabbedTextOut.
Improved drawing engine
The whole thrust behind this tutorial is to be able to render text to the TextView window, using the ATTR structure as a guide for how the text should look. The drawing logic is shared between the following functions:
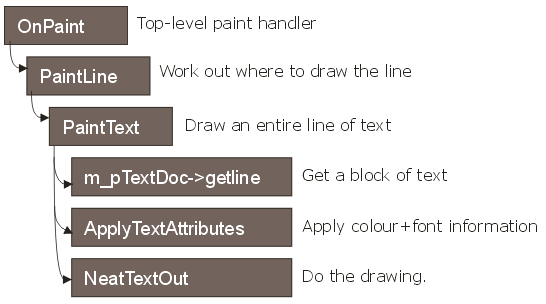
The first function - OnPaint - hasn’t changed at all, whereas the PaintLine function has actually been reduced in functionality. All it does is work out where to draw the line, and then passes control to a further function, PaintText, to do the actual work. My reasoning behind this decision is to allow PaintLine to handle selection margins and line-numbers at some time in the future, and to allow PaintText to just draw the text and nothing else.
The PaintText function is therefore responsible for drawing an entire line of text. It retrieves text from the TextDocument and applies colour formatting to the text by calling ApplyTextAttributes before calling NeatTextOut to display the text.
The benefit of this design is that the drawing code is completely independent of the rest of the TextView. I like this approach because it means that text drawing is isolated into one single place. Any future syntax-highlighting, mouse selection, bookmarks or any other changes will not impact on the drawing code because it is completely dumb - all it knows how to do is draw text in particular styles. It will be up to the syntax highlighter to create these styles, but this is a separate, well-contained problem of it’s own.
Understand that when we draw text we have two parallel arrays - one holding the text and the other holding each character’s colour attributes. Iterating through these arrays and drawing the text character by character will be very slow, so instead PaintText collects together as much text as possible before drawing it. What it does is identify consecutive characters that share the same colour and font, and outputs each “span” of text in one go. The result is very fast and in practise is not really any slower than doing a single TextOut. The important part of the PaintText routine is shown below.
int i = 0; // current character position
int lasti = 0; // last character position
int xtab = xpos;

char buff[100];
ATTR attr[100];

//
// Display the text by breaking it into spans of colour/style
//
for(i = 0; i <= len; i++)
{
    // if the colour or font changes, then need to output
    if(i == len ||
       attr[i].fg != attr[lasti].fg ||
       attr[i].bg != attr[lasti].bg ||
       attr[i].style != attr[lasti].style)
    {
        xpos += NeatTextOut(hdc, xpos, ypos, buff + lasti, i - lasti, xtab, &attr[lasti]);
        lasti = i;
    }
}
I’m not going to include any more code in this tutorial because the sourcecode download is well documented - as always ;-) and it is very easy to see what is going on.
Coming up in Part 5
Mouse input and selection definitely be the subject of the next tutorial. It was necessary to delay the this subject because without proper drawing support selection highlighting would not have been realistically possible. We will also implement “mouse scrolling” - i.e. where the text selection is extended beyond the window and the contents must be scrolled into view. The scrolling work we have done so far will make this task very simple.
 neatpad4.zip