Splitter Windows
6 minute read •
Updated 5 Jan 2006
I’ve added a new sourcecode download from L.D. Blake who kindly sent me a great little splitter library called “Easy Split”. From the readme:
“EasySplitter is a custom control, in library format, that can be used with Pelles C to implement a very simple splitter window. With EasySplitter you create a splitter bar as a windows control that you can size, move and stylize like any other windows control. All mouse capture and window drag operations are handled internally by the control itself.”
Introduction
There is no such thing as a “splitter window”. Sorry to disappoint anyone who wants to implement one, but I can’t say it any simpler than that. Neither does there exist any method to split a window in half or quarters. What you are seeing when you see a so-called “splitter window” is a visual illusion.
What people most likely mean when they say “splitter windows”, is the horizontal or vertical bar which separates two windows. This bar can be dragged back and forth using the mouse to resize the two windows which it separates.

There is no trickery used to perform this behaviour. This resizing or splitter bar is just a standard window, but the windows it divides and the bar itself are arranged in such a way to give the required effect.
There are two main ways of implementing a divider bar between two windows. They differ only in the organisation and relationship of the windows involved.
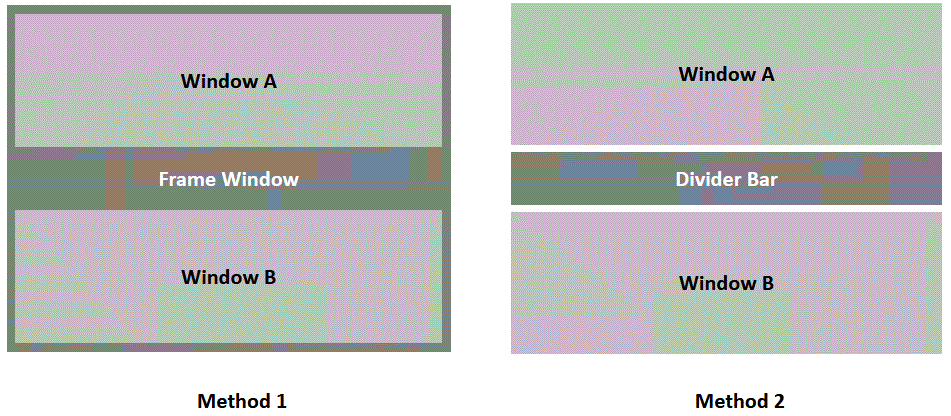
- The first method is to host the windows you want to divide in a “frame” window. This frame window is just a standard window, but it handles all of the divider mouse messages. This frame window contains all the windows that need to be divided from each other. This frame window doesn’t have to be the main window of an application, although it could be.
- The second method uses a separate window which is positioned and sized to act like a divider-bar in-between the two windows that you want to divide.
Both cases take advantage of the way that standard windows are drawn. Because the two windows will be positioned close to each other, their 3d borders give the illusion that there is a 3d bar in-between the two windows. In reality, it is just a standard flat grey window with no fancy graphics.
Mouse cursor display
To make it obvious to the user that our splitter bar actually does something useful, then it is necessary to display some kind of sizing mouse cursor when the mouse moves over the “bar”.

A cursor similar to the two above is probably the right kind of thing to display. There are two ways to display a custom cursor in a window.
- The first is to process the
WM_SETCURSORmessage. This is the best way if you want to support different types of cursor within the same window. By processing this message, you can use the SetCursor API call to set the cursor. This is the most flexible way to modify a window’s mouse cursor. - The second way, and the easiest, is to specify what the mouse cursor should be when you register the window class associated with the window you want to create. Because we are creating a new type of window to create the splitter effect, we can set the
hCursormember of theWNDCLASSEXstructure when we register the splitter class.
This is the code that we use to register the splitter class.
WNDCLASSEX wc;
 ...
 wc.cbSize = sizeof(wndclass);
 wc.style = 0;
 wc.lpfnWndProc = SplitterProc;
 wc.cbClsExtra = 0;
 wc.cbWndExtra = 0;
 wc.hInstance = hInstance;
 wc.hIcon = NULL;
 wc.hCursor = LoadCursor (hInstance, MAKEINTRESOURCE(IDC_HORZSPLITTER));
 wc.hbrBackground = (HBRUSH)(COLOR_3DFACE+1);
 wc.lpszMenuName = NULL;
 wc.lpszClassName = "Splitter";
 wc.hIconSm = NULL;

 RegisterClassEx(&wc);
Handling Mouse Messages
To make a useable splitter bar, we need to handle the three standard mouse messages. Typical code that we would want to execute when the mouse button is pressed over our splitter window is below. Note that this is not executable code - it is presented to give an idea of the steps necessary to implement the dragging around of a splitter bar.
Mouse button down (WM_LBUTTONDOWN)
splitpos = GetCursorPos();

 fDragMode = TRUE; /* set dragging to active */
 SetCapture(hwnd); /* capture the mouse so we receive all messages */

 hdc = GetDC(hwnd); /* Draw the checkered resizing bar */
 DrawXorBar(hdc, splitpos);
 ReleaseDC(hwnd);

 old_splitpos = splitpos;
Mouse move (WM_MOUSEMOVE)
if(fDragMode == FALSE) return;

 splitpos = GetCursorPos();

 hdc = GetDC(hwnd);

 DrawXorBar(hdc, old_splitpos); /* Erase where the bar WAS */
 DrawXorBar(hdc, splitpos); /* Draw it where it IS now */

 ReleaseDC(hwnd);

 old_splitpos = splitpos;
Mouse button up (WM_LBUTTONUP)
if(fDragMode == FALSE) return;

 fDragMode = FALSE; /* set dragging to unactive */
 ReleaseCapture(); /* release the mouse capture: we don't need it */
 hdc = GetDC(hwnd); /* Draw the bar again to erase it */

 DrawXorBar(hdc, old_splitpos);
 ReleaseDC(hwnd);
Although the code above is just a sample of what needs to be achieved, in reality the code is not much more complex. Probably the most complicated thing to do is to draw some kind of checkered bar to provide feed-back when the splitter bar is dragged around.
Drawing the feedback bar
The feedback bar is just a simple rectangle, but drawn using a checkered pattern. Because we draw the rectangle using the PATINVERT style, we can easly restore the background to its original state by simply drawing the same rectangle back to the original position. So, calling DrawXorBar twice in succession will draw the checkered bar, but then immediately erase it again, restoring the background.
void DrawXorBar(HDC hdc, int x1, int y1, int width, int height)
{
  static WORD _dotPatternBmp[8] = { 0x00aa, 0x0055, 0x00aa, 0x0055, 0x00aa, 0x0055, 0x00aa, 0x0055};

  HBITMAP hbm;
  HBRUSH hbr, hbrushOld;

  /* create a monochrome checkered pattern */
  hbm = CreateBitmap(8, 8, 1, 1, _dotPatternBmp);
  hbr = CreatePatternBrush(hbm);

  SetBrushOrgEx(hdc, x1, y1, 0);
  hbrushOld = (HBRUSH)SelectObject(hdc, hbr);

  /* draw the checkered rectangle to the screen */
  PatBlt(hdc, x1, y1, width, height, PATINVERT);

  SelectObject(hdc, hbrushOld);
  DeleteObject(hbr);
  DeleteObject(hbm);
}
Conclusion
I have presented the basic steps necessary to create a divider bar, or splitter window as it is more commonly refered to. What I haven’t described is how to create a generic frame-work which magically does all of this work for you. If you want a frame-work to do this, then go and use MFC in your projects. Otherwise, it is up to you, the programmer, to decide how to arrange and manage your windows.
This sample project below implements a simple splitter bar to get you started.
 splitter.zip