Docking Toolbars - Part 2
14 minute read •
Updated 3 May 2005
The following projects are enhancements of the original docking code found in this tutorial.
- Docking Windows using DWinLib by David O’Neil www.randommonkeyworks.com
- Docking Toolbars by Jeff Glatt www.codeproject.com/useritems/dockwnd.asp
Introduction
After a long delay I’ve finally finished part 2 of the Docking Toolbar series. The previous article took you through the steps necessary to create floating tool windows. This article will discuss the techniques necessary to get these floating windows to “dock” with a main window. I’m not going to present must source-code in this tutorial, because quite alot is involved. Of course, you can download the code using the link above, but I’m going to take a higher-level approach with this tutorial.
What is involved?
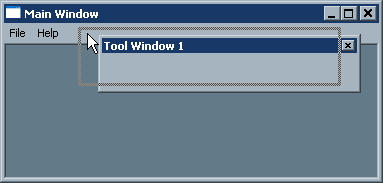
First of all I need to define the terms “Docked” and “Undocked”. A window is docked when it is a child of another window. i.e. it is contained by some parent window, which moves and sizes it appropriately when the main window is resized. It is important to understand that it is the parent window which is responsible for positioning the “docked” window. On the other hand, a window is undocked (or floating) when it is a popup window. i.e. the tool window still has an owner, but it is not contained in any way.
There are many different ways to implement docking windows. This is because there is no standard, built-in docking window support in Windows. The result of this is that application developers have had to implement their own docking windows, or rely on 3rd party libraries to do the work for them (such as MFC).
However, there are two major types of docking window which you can choose from. The most common (and intuitive, in my opinion) is the type that you drag around the screen using the mouse. When you move one of these windows, instead of the window moving, a drag-rectangle (feedback rectangle) is XORed on the screen, showing the outline of where the window will move to when you release the mouse - like the way windows work when full-window dragging is turned off. With this method, when a window is dragged to / from a window, the feedback rectangle visibly changes to indicate that the window can be dropped. This is the docking behaviour that I will be presenting in this tutorial.
The second type of docking can be found in some newer style applications (such as Microsoft Outlook). Instead of a feedback rectangle, windows can be directly “teared” or “snapped” on or off a main window - i.e, they snap into place as soon as you manipulate them. Personally, I don’t like this type of user-interface, so I’m not going to do any work on this.
Providing an Intuitive User Experience
Docking toolbars are so common that it is natural to stick with the same conventions as other applications. Our docking windows will have the following characteristics:
- A docking window will use a feedback (drag) rectangle to indicate it being moved around the screen - even if the “full window drag” system setting is in operation.
- When a docking window is dragged around the screen, at some point it will intersect the main application window. When this happens, the feedback rectangle will need to visibly change in order to reflect the fact that there is a docking “region”. Normal convention is for a wide (say three pixel) shaded border to represent a floating position, and for a single-pixel border to represent a docked position.
- When the mouse is released after dragging a dock-window, a test must be made to see if the window should be made to dock or float.
- A docking window can be forced to float, even when the drag-rectangle is released over the main window. This is usually achieved by holding the
<Control>key down.
A docking window can be resized when it is floating, because it is just a normal window. No special processing is required to do this - the standard Windows sizing behaviour can be used in this case.
Now that we have decided what our goal is, the next step is to start coding!
Docking and Undocking a window
The first problem you will encounter is trying to make a window toggle between being a child window and a popup window. This is not as easy as it sounds, but can be accomplished with the code shown below.
void ToggleDocking(HWND hwnd)
{
    DWORD dwStyle = GetWindowLong(hwnd, GWL_STYLE);

    if(dwStyle & WS_CHILD)
    {
        /* toggle from WS_CHILD to WS_POPUP. */
        SetWindowLong(hwnd, GWL_STYLE, (dwStyle & ~WS_CHILD) | WS_POPUP);
        SetParent(hwnd, NULL);
    }
    else
    {
        /* toggle from WS_POPUP to WS_CHILD */
        SetWindowLong(hwnd, GWL_STYLE, (dwStyle & ~WS_POPUP) | WS_CHILD);
        SetParent(hwnd, GetWindow(hwnd, GW_OWNER));
    }
}
Look at the first SetParent API call in the code above. The only way to make a child window into a popup window is to set it’s parent window to zero (NULL). This may seem as if the popup window no longer has a parent, and won’t float above the main window anymore. However, the tool-window will always have an owner window (the parent window specified during creation), even if it’s parent is subsequently set to NULL. Therefore the toolwindow will always float above the main window, when it has the WS_POPUP style.
Tool Window Frames
The purpose of a frame window is to simply contain some other window or windows within it. In the case of our dockable tool windows, we will use a container window to hold our actual Toolbar or TreeView, or whatever it is that we want the user to interact with.
Bearing this in mind, it doesn’t matter if the tool window is docked or undocked - the important part (the contents) will always be a child window contained in a frame. This means that the child window (a dialog template, TreeView, whatever) doesn’t need any special attention because the docking behaviour is now entirely separate from the contents. This is good software design, because it allows us to define distinct software elements which do not need to be dependent on each other.
At this stage you must make a decision. There are basically two types of window “management” you can choose from:
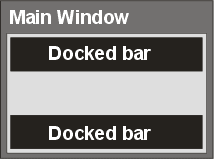
- Host and docked tool-windows directly in the application main window (easiest to implement, less code). This does mean that the main window has be able to manage an unknown number of docked windows - size them, reposition them etc, which could make a larger application a bit more fiddly to code.
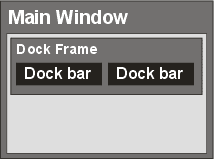
- Create a second type of window, a “tool window container”. This container window would manage any docked windows placed on it - sizing them, looking after them etc. The container window would always be present in the main frame-window, so the main application code would only have to worry about this one window. This method would probably provide for a better designed application in the long-run, but does require more careful thought (and more coding).
 |  |
| Method 1 | Method 2 |
The choice is up to you, really. The docking library you can download from this page uses the first type of docking window, but depending on how you want to implement your application, you might want to decide to opt for the second.
Create a docking window
There are many different ways to create a docking window. I imagine most of the code on the Internet uses well-designed C++ classes to hide the implementation. However, I still prefer to code in C, so the design of this library will be a non-object oriented approach.
First, some assumptions must be made. We are creating docking windows, right? Docking windows can be in one of two states: docked, or undocked. This means that we need to remember where the docking window is, so that when we dock/undock the window, it is always positioned in the right place. Also, when we quit our application and restart it, the user will normally expect his/her window arrangement to be exactly the same. So, we need some kind of structure to track the state of a docking window, don’t we? (Yes, we do!)
typedef struct
{
    DWORD dwStyle; //styles..
    int xpos; //coordinates of FRAME when floating
    int ypos;
    int cxFloating; //size of CONTENTS when floating
    int cyFloating;
    int nDockedSize; //width/height of CONTENTS when docked..
    BOOL fDocked; //is window docked?
    HWND hwndContents; //handle to the window to host} DockWnd;
This structure will be our starting point for a docking window. For every docking window that we want to create, we must maintain a unique DockWnd structure, which describes the docking window state. This structure would probably be a global variable. So, even if the docking window is hidden (or has been destroyed), we always know the exact state that it should be recreated in.
There are basically two main groups of information that we use in one of these structures: floating position, and docked position.
When a dock-window is floating, we need to know it’s coordinates on the screen, and also it’s size. We actually keep track of the size of the dock-window contents (it’s child window) instead of the physical size of the dock-window. This is because we always want the contents to remain the same size, even when the system settings change (i.e. the titlebar height is modified using Control Panel).
When a dock-window is docked, we only need to know one dimension: the width (or height) of the window. We need just one dimension, because when a window is docked (say at the top of the main window), it will be stretched to fit the width of the main window. It is only the height of the docked window that can be represented in our structure (using the nDockedSize member).
The following function will create a docking window. I don’t want to describe any coding details, because it’s all in the source-download.
HWND CreateDockWnd(DockWnd *dwp, HWND hwndParent, TCHAR szCaption[]);
The first parameter must be the address of one of our DockWnd structures. This structure must be already set up correctly before calling CreateDockWnd. The function call creates and positions the docking window, based on the members in the structure. Below is a small example of how you would use the function call.
DockWnd dock1;
...

/* Set the DockWnd structure up */
dock1.dwStyle = 0;
dock1.xpos = 123;
dock1.ypos = 456;
dock1.cxFloating = 200;
dock1.cyFloating = 100;
dock1.nDockedSize = 80;
dock1.fDocked = FALSE; /* Make window float initially */
dock1.hwndContents = hwndEdit; /* Some child window *//* Create a docking window! */

HWND hwndDock1 = CreateDockWnd(&dock1, hwndMain, "Docking Toolbar #1");
Now that we can create a docking window, we can move on and give it a bit of functionality.
Moving a window with a drag-rectangle
The first obstacle you will encounter is getting Windows to show a feedback rectangle when you move a floating window around. Starting with Windows 95, a new user-interface feature was introduced. This is feature is normally referred to as “Show window contents whilst dragging”. When enabled, windows are no longer moved and sized using the standard feedback rectangle.
Unfortunately there is no way to turn this feature off for specific windows.The SystemParametersInfo API call, (with the SPI_GETDRAGFULLWINDOWS setting) can turn this feature on and off, but this is a system-wide setting, and is not really suitable. Of course, we could devise a method where we temporarily turned off the drag-window system setting when just during the window movement (actually, this would be very straight-forward). The point is, it’s a bit of a hack, and I prefer proper solutions to problems like this.
The only solution is to override the standard windows behaviour and manually provide a feedback rectangle. This means processing a few mouse messages. Now, I don’t want to show any code - again, the source-download clearly demonstrates how to get this working. What I will do is give a basic outline of the processing that is required.
Prevent default window dragging
The most important task is to stop the user from dragging the window around with the mouse. I know this sounds counter-productive, but we need to completely take over the standard window movement logic. This is actually quite simple - our docking window procedure just needs to handle WM_NCLBUTTONDOWN, and return 0 if the mouse is clicked in the caption area. By preventing the default window procedure from handling this message, window dragging is completely disabled.
Moving the drag-rectangle
In order to simulate the window being moved, we need to handle a few mouse messages. Only three need processing:
WM_NCLBUTTONDOWN- in addition to what was described above, this message handler must draw the feedback rectangle, and set the mouse capture, using the SetCapture API call.WM_MOUSEMOVE- this message will be received whenever the mouse is moved. Our response will be to redraw the feedback rectangle in the new position (erase it in the old position and draw it in the new position). In addition, we need to decide what type of rectangle to draw, depending on if the current feedback rectangle will result in a docked / floating window position when the mouse is released.WM_LBUTTONUP- when the mouse is released, we need to remove the feedback rectangle from the screen, and then take the appropriate action to physically reposition the dock-window. This may mean docking / undocking, or simply moving the window if it was already floating.
As you can see, there’s a little bit of work involved, but nothing particularly complicated. The big advantage of using this method is that the same mouse code can be used when the window is docked or floating - this keeps the code short and simple.
Drawing a drag-rectangle
A drag-rectangle is basically just a simple rectangle. This rectangle ideally needs to be drawn using XOR blitting logic - so that we can easily draw / erase the rectangle as it is moving around.

The code below draws a shaded rectangle with the specified coordinates. The equivalent function in the source-download does a little more than the code below (it draws both types of drag-rectangle), but I’ve stripped it down to keep it simple.
void DrawXorFrame(int x, int y, int width, int height)
{
    /* Raw bits for bitmap - enough for an 8x8 monochrome image */
    static WORD _dotPatternBmp1[] =
    {
        0x00aa, 0x0055, 0x00aa, 0x0055, 0x00aa, 0x0055, 0x00aa, 0x0055
    };

    HBITMAP hbm;
    HBRUSH hbr;
    HANDLE hbrushOld;
    WORD *bitmap;

    int border = 3;

    HDC hdc = GetDC(0);

    /* Create a patterned bitmap to draw the borders */
    hbm = CreateBitmap(8, 8, 1, 1, _dotPatternBmp1);
    hbr = CreatePatternBrush(hbm);

    hbrushOld = SelectObject(hdc, hbr);

    /* Draw the rectangle in four stages - top, right, bottom, left */
    PatBlt(hdc, x+border, y, width-border, border, PATINVERT);
    PatBlt(hdc, x+width-border, y+border, border, height-border, PATINVERT);
    PatBlt(hdc, x, y+height-border, width-border, border, PATINVERT);
    PatBlt(hdc, x, y, border, height-border, PATINVERT);

    /* Clean up */
    SelectObject(hdc, hbrushOld);
    DeleteObject(hbr);
    DeleteObject(hbm);
    ReleaseDC(0, hdc);
}
Decide when a window can be docked
When a docking window is repositioned (basically, dragged around using the mouse), it’s docking status may need to be toggled. The problem is, this decision making is probably going to be different from application to application - when and how a window is able to dock is really up to the programmer. A simple strategy to start with might be this: if the dock-window intersects (overlaps) the main window, then it is eligible to be docked with that window, otherwise it will be made to float (i.e. when it does not overlap the main window).
This decision will have to be made many times during the repositioning of a dock-window. Therefore, we will introduce a new windows message, which we will send via the WM_NOTIFY message:
#define DWN_ISDOCKABLE ... /* some value that doesn't already exist */
This message will have one parameter (sent through lParam) - a pointer to a DockWndQuery structure, defined below:
typedef struct
{
    HWND hwndDock; /* Handle to dock-window */
    DockWnd *pDockWnd; /* Pointer to the DockWnd structure for that window */
    RECT *dragrect; /* Current drag-rectangle */
} DockWndQuery;
A dock-window will send this message to it’s parent (or owner) window when it is being repositioned and needs to know if the drag-rectangle position will result in the dock-window being docked or floating. It will be the responsibility of the parent window (normally, the main frame window) to handle this message.
I have provided a “helper” function, DockWnd_GetDockSide , which can be used to handle this special message. Just look in the sample application download for more information.
Conclusion
That’s about all for the moment. The source-code download presents a fairly complete docking window library, and a small sample application to show you how to use it. Hopefully you should be able to plug this library straight into your applications and get instant docking windows!
I realise that this is quite a tricky subject area, and unfortuntately there is no simple solution to the problem. Anyway, I’d definitely like have your feedback, to make sure I’ve covered enough material. Although the source-code is fairly well commented, it may not be optimal. If you make any improvements, be sure to let me have a copy! Remember as well, that this is just one of the many methods of implementing docking windows. Even if my design doesn’t fit into your particular scenario, you should get enough ideas from the code to implement your own framework.
 dock2.zip